Sunday, May 12, 2013

Plush Team!


Just a quick note to mention that I was accepted to Etsy's Plush Team this quarter (yay! that was a big 2013 business goal for me!) and I have a post up today on the evolution of my giraffe plush design. Please go check it out! 

Monday, May 6, 2013

Progress

Couture dress front
Well, I certainly didn't *mean* to take a 6-month break from the blog, but...! Life, you know? I'm just popping in today to share a bit of progress, because even though things aren't being blogged here or posted to my Flickr page (both things I really want to improve upon), they are happening.

Couture dress midriff front
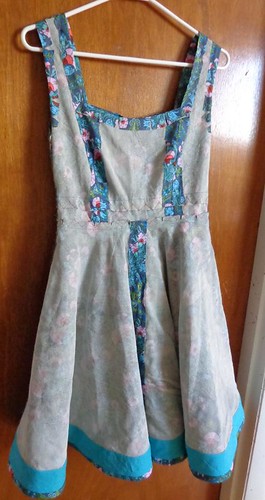
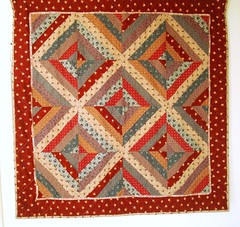
For instance: this dress. This is my in-progress couture dress from the Susan Khalje Couture Dress class on Craftsy.com. I have been working on this pretty much exclusively for two months already! I had hoped to finish a month ago, in time for my birthday, as is my tradition, but alas... (I tabled the dress for a day and whipped up another, so no fretting! I did have my birthday dress!) I knew this dress would be time-consuming, but underestimated exactly how much time!

Couture dress front bodice side detail
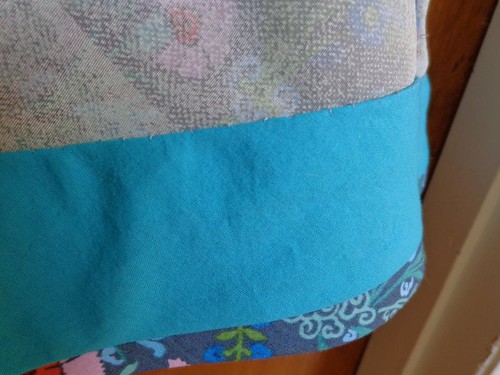
Still... It is phenomenal. I am loving it. The dress is made from an Amy Butler voile print, underlined in silk organza. I got a deal on the silk because it was "printed" to look like a linen texture. The printing side is a little sticky to iron, but the other? Fab. And it's silk! And it was half price. Score.

Couture dress back
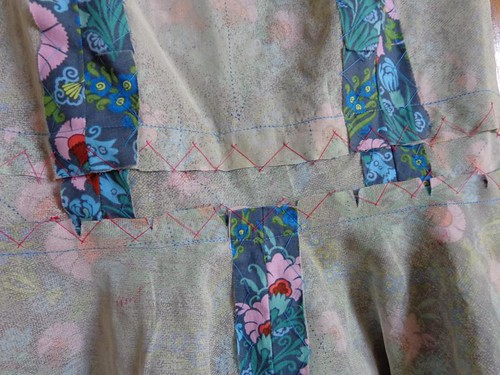
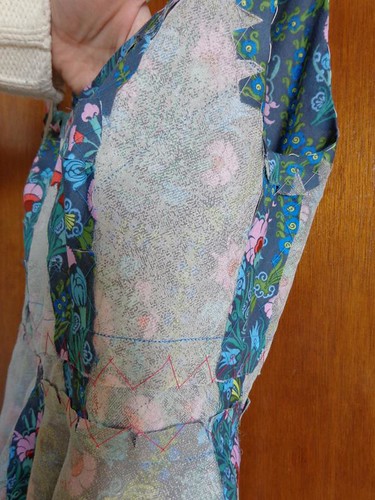
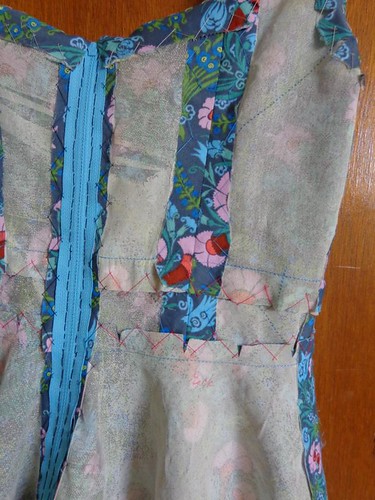
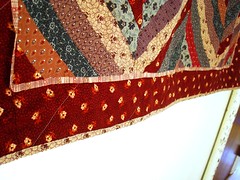
In these photos you can see the silk organza underlining and the many many many catch-stitches I did, in various thread colors, to hold the seam allowances open by tacking them to the underlining. In some places on the underlining you can see the grainline marks that I transferred while tracing, or even my marker labels of "front" and "back" on the circle skirt pieces, which are slightly different. You can also see the back of my hand-picked zipper. It was my first time doing ALL of these techniques, much less in one garment!

Couture dress hem
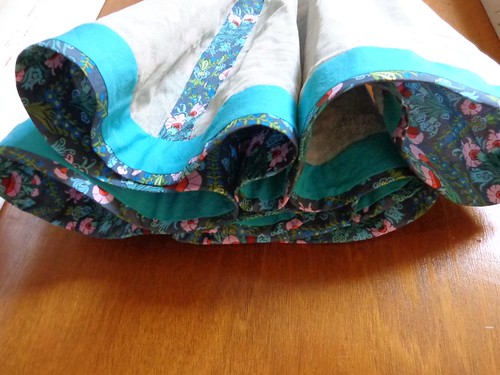
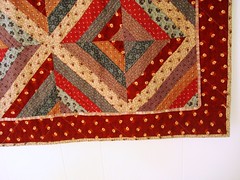
And oh, this hem! This hem. I have spent probably 12 hours on this hem! Fully encased in there is a 2" wide strip of horsehair braid! I didn't leave enough hem allowance to enclose the braid when I cut the skirt pieces, so I created a hem facing out of a wide bias strip of lining fabric. The horsehair braid was catch-stitched to the turn of the hem, and then shaped into a curve and catch-stitched at the top of the braid as well. The bias strip was then pressed up and fell-stitched to completely cover the horsehair braid--both to hide all those loose catch-stitch threads and to keep the braid safe from washing and wearing. And look at those lovely cones and graceful folds of fabric! I'm very pleased with these results.

Couture dress hem detail
So, what's left? I've basted the skirt lining in place and am working on fell-stitching the bodice lining around ALL the outer edges, and then understitching it to the seam allowance as well. Then goes in the midriff band, and then the lining hem! And then all the finishing touches. Heh. So, I still have a ways to go, but nothing near all the work I've already put in, what with tracing and fitting and hand-basting the entire thing together... Still, it's the best fit I think I've ever gotten on a garment, as you will see! The work is all totally worth it, and I'm really enjoying the process. Still, I need to wrap this up, because I've got some 
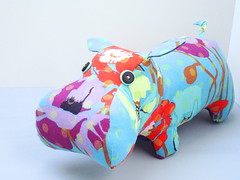
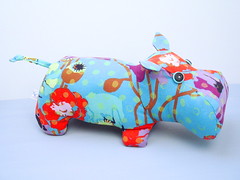
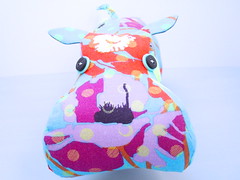
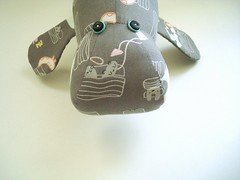
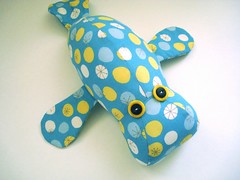
plush drafting to do! I hope to debut at least one new animal at this upcoming show I've been accepted to! (!!!!!!!)

And if you're interested in more frequent updates from me, I hang out on Twitter a lot, and have been posting on Instagram and my Facebook page a bit as well.

Monday, November 12, 2012

Please give.

As I mentioned in my last post, we were very fortunate during Superstorm Sandy and didn't even lost power. So many others were not nearly so lucky. I wanted to help, but what could I do?

Hippo for donation
Enter Gather Here. The lovely and generous Virginia and Noah have organized a fundraiser. All funds go to the Red Cross, BUT! there are a ton of amazing prizes donated by lots of amazing makers. For every $10 you donate, you're entered into a drawing to win one of these fabulous prizes.

Hippo for donation
I am of the belief that we should do good without expecting something in return (the good deed is all the good we should need, no?), but sometimes it's hard to know where to give or how much to give. So, in addition to making my own donation, I've made the hippo you see in this post especially for this raffle Gather Here is hosting.

Hippo for donation
If you haven't given any money yet, please do consider making a donation to the Red Cross. And if you have, feel free to enter yourself in the drawing to win something awesome. The fundraiser is open until 11/19, so there's still time! You can see how much has been raised HERE. So many people have given time and talent and amazing handmade goods; it's a wonderful community, and I couldn't be happier to be a part of it.

Friday, November 2, 2012

Bonnie Quilt

Bonnie quilt
Oh my. You know how it is when your to-do list is so long and overwhelming that instead of diving in and doing ALL THE THINGS you just come home from work, drink vegan white russians, and collapse on the couch? Yeah, that. For me, it's not really a lack of crafting, though there is some of that; it's more a lack of photo-editing and uploading and blogging and linking. It just feels like so much effort; I've been skipping it.

Bonnie quilt
BUT! This is my attempt to return! And catch you up on some un-blogged project, plus some goings-on. First: the Bonnie Quilt! This is a wallhanging that finished around 44" square. It was commissioned by Bonnie, who lives next door to my parents (and has for my entire life) and just did a lovely living room remodel. She has a wood-paneled wall behind her couch, across from a big bay window. When she removed the old art she had on the wall, it was discolored, so she ordered a quilt from me to fill that space.

Bonnie quilt
The colors she's using for her new living room are a dark brick red, tan, and some deep green furniture. Not my usual palette, but she wanted lots of colors in the quilt, and I knew that Civil War repros were the way to go. Luckily, my LQS MarketPlace Quilts carries a wide variety of gorgeous repros, so I got exactly what I needed: cranberry, deep purple and blue, and a little teal.

Bonnie quilt
I drafted my own string blocks so that the secondary diamond pattern in cream would be created, and I just love that effect. The cranberry border has a narrow flat-piping to set it off, and I like the end "framed" result. I quilted a diagonal grid through the center bit, and carried some of the lines through on the border as well. When I was in Wisconsin in June (yes, this has been finished since May but is only just now hitting the blog), my mom and I helped Bonnie hang it up, and it was the perfect addition to her new room. Success!

So, here's a quick rundown on what's up with me these days:
  • First, we survived Sandy without even losing power. We are incredibly lucky and feel so very grateful to have been spared the worst. I'm doing a bit to help those who weren't so lucky, and will have more info on that next week.
  • New photos in the shop! I finally got around to some props and styling and re-photographed ALL of my inventory. Take a peek, and let me know what you think! I have a half-dozen more manatees to add once I get them photographed!
  • Impending Dear Jane update! For REAL; I'm on row H now, guys! I've certainly fallen off my block-a-week schedule, but when we were fearing we'd lose power during Sandy, I heated up the iron and prepped 5 more blocks, so I have some catching up to do.
  • Rob's book is coming out SOON! We'll be in DC and Baltimore in less than 2 weeks for a mini book tour, and I couldn't be more excited or proud. You can pre-order here, and check out some amazing art created in response to the book here, at Sundog Lit. There's a lot more coming, so stay tuned!
  • Last but certainly not least, I'm going to be an auntie! My brother and sister-in-law, who were married last October, are expecting Baby Swenson in March. I'm knee-deep in nursery decor right now, and the baby handmades haven't begun yet!

Friday, September 7, 2012

Manatees!

Newsletter #1!

Have you seen? Did you hear? Manatees are now available in my shop on Etsy! Newsletter subscribers were the first to find out. Want to be included? Sign up here!

zigzag manatee 6
I've always loved manatees, since I first saw them as a kid at Homosassa Springs in Florida, where we used to go when visiting my grandparents. My eighth grade speech was on manatees and conservation, and I had a plush manatee long ago, a last-minute purchase from an airport gift shop before we flew back to Wisconsin. Manatees are gentle, beautiful herbivores, and I knew I needed to honor them in softie form!

monsterz manatee 9
The problem was I couldn't figure out how to attach the head to the body. Should I shape it with a dart? Add a gusset? I was stuck. So when Abby Glassenberg announced a softie design class at Gather Here, I jumped at the chance! Abby is one of my softie-making idols, and working with her was so exciting! She helped me figure out the head, and gave me some great suggestions for the flippers and shaping the tail. If only I could have her help me with ALL of my designs... Her Design-Your-Own Plush series has been invaluable, and I am eagerly awaiting her new book on the same topic, due out this spring!

mod dot manatee 1
I hope you love these little guys as much as I do! They are SO fun to make! I use some quilt batting in the flippers and tail to add a little extra *squish*, which may be my favorite part of all!

2 hippos
Of course, I am still making my beloved hippos, too! There are plenty more listed in the shop, including this pink and green one inspired by fabric chosen for a custom job, and this sweet fishy one (at a discount!) with a little pucker on its belly. They all need good homes, and I need some more room for new softies!

Thursday, August 16, 2012

Introducing...The Betty Skirt!

Betty skirt - border print 2
Remember this skirt? Well, here it is in full. It is a super simple construction: two lengths of fabric, sewn selvage-t0-selvage, and then gathered the heck out of to fit a waistband. Super easy. So easy I felt confident enough to tackle it with a border print (gasp!). So easy...I made a whole bunch more!

Betty skirt - Innocent Crush voile 3
Here's my second version, out of Anna Maria Horner Innocent Crush voile. I'd had this in my stash for a long time and just didn't know what to do with it. Proof positive that sometimes holding onto something until the right project comes along is important. I wear this skirt all the time now!

Betty skirt - Innocent Crush voile 2
This one has a few improvements over the first. Namely: pockets. Not as awesome of an addition but even more necessary: underskirt. (This one is made from a dark gray Bemberg rayon.) Because these skirts are made from cotton lawn or voile and are floaty. All it takes is one little breeze to pick up any bit of that 100"+ hem circumference and woosh! the skirt is around your shoulders. Yep, the built-in underskirt is a necessity, which means my border print is relegated to having a slip and / or heavy tights underneath.

Betty skirt - leaf lawn 4
And my third and, arguably, best version: the leaf skirt. This one is made from fabric I picked up at Mood last April. That was actually when I got the idea to make this skirt; it just took me a year to put it into practice!

Betty skirt - leaf lawn 2
Check out that fabulous pattern-matching for the inside of the pocket! Too bad I ran out of fabric and couldn't match as well on the other side...

So, why is this named the "Betty" skirt? Two reasons: 1) The fullness of the skirt totally reminds me of something season 1 Betty Draper would've worn, and 2) Wearing a super full and floaty skirt makes a girl feel like a total Betty.

Amber in Betty skirt
This skirt was so easy to make that I felt confident enough to make one long-distance for my friend Amber in DC! Look how cute she is in it! I love how she styled it with that striped top, too (the two of us are a little obsessed with print-mixing). I was able to use her measurements and make her two skirts that fit perfectly with no alterations! That made me awfully excited.

I want to remind you about my newsletter (which you can sign up for here!) and my Facebook page (here!). New softies revealed and online this weekend; I promise!

Thursday, August 9, 2012

Catching Up: Tops

Lavender blouse 4
What's a girl to do with an overwhelming pile of photos to be edited (from, seriously, months ago) and then blogged? Just plunge in, I suppose.

Lavender blouse 5
So, this is me, plunging. Remember in the spring when I was making tops? Like this one? I decided I was on a roll and would finally make up some that were in my stash / on my to do list for years. This is one of them.

Lavender blouse 3
I bought this fabric probably 5 years ago. It's some kind of polyester crepe thing that I would never buy now. It frays like mad, too. But at the time, I was wearing a RTW peachy-champagne-colored top in a similar silhouette that I just loved, so decided to make my own version of it. Out of this lavender satiny stuff.

Lavender blouse 2
The pattern is New Look 6705 and, from what I can remember, worked up quickly and easily. I French-seamed the entire thing, and omitted interfacing in the yoke. This top is really similar to the RTW one I loved (and still wear a few times every winter), except the fabric is thicker and doesn't drape as well. I always worry about wearing things that are so flowy / blouse-y--do they read maternity? I paired this with a tight skirt, but I don't know if that makes a difference. Thoughts on this? I may revisit the pattern for some of the other options; doesn't the little puff-sleeve version look adorable?

Roundabout Blouse 2
I was on a roll, and French-seaming ALL the things, so I finally made up this Roundabout blouse from the pattern by Anna Maria Horner. There is a sad, sorry lack of these on the interwebs; what gives, crafters? Nobody else likes this pattern? I got the pattern to make the dress, originally... and then I realized that drop-waist dresses look godawful on me, so I scrapped that plan for the blouse instead. A blouse that I can't wear with a skirt, because it makes me look like I'm wearing a sack. This is definitely a with-pants pattern.

Roundabout Blouse back
The fabric I used (Valori Wells Nest voile--super old, I know!) is sheer. And directional. So I ended up making the Roundabout slip, in the cami version, to go underneath. And for that, I used more of the cotton-silk poplin I had leftover from CK's wedding dress last year. It's nearly gone! But oh man, is it luxurious. I French-seamed the cami (ALL the things!) and made the straps a little long, so it wouldn't peek out the neckline of the blouse. I gotta say, that bias-cut cami is a sexy little number. If you haven't made one for yourself, you really should. The silk is just an added bonus.

Roundabout Blouse 1
I think this project is successful, though if I remade it, I would shorten the sleeves to just above the elbows, tighten the cuffs a smidge, and leave the neckline pleats closest to the shoulders on the front undone. It's a leeeettle bit snug up top *ahem*, but with no other shaping, nothing worth performing an FBA on.

And there you have it: two tops I made in March, photographed in April, uploaded in July, and blogged in August. There is more where that came from, so keep your eyes peeled!

I also want to shamelessly plug my newsletter (which you can sign up for here!) and my Facebook page (here!). I'm editing photos for my newest batch of softies, to be listed in my shop soon, but if you join the newsletter, you'll get the first peek! They're awfully cute, if I do say so myself!