Monday, June 28, 2010

My weekend of patternmaking

DIY Kathy dress 3
My day job has been making me crazy and stressed, and my upcoming trip to Wisconsin to see the family (we hop in a cab at 3:45 tomorrow morning--ugh) has also been adding to that crazy/stress/insomnia cocktail, so instead of working more overtime or packing or doing anything work- or trip-related over the weekend, I did what any other crafter in my situation would do: I sewed. Sometimes, you just need to stop, step back, and switch to an activity where 1/2" seams are always 1/2" seams and your hands know exactly what to do, you know?

DIY Kathy dress 1
I've had Cal Patch's amazing Design-It-Yourself Clothes: Patternmaking Simplified for months now and finally decided to delve in this weekend. WOW. I thought, when I bought the book, that I'd develop a crush on Cal Patch, but I never expected to fall in love with her and this book! I originally started doing clothes with the "just wing it" method, which then see-sawed into the "follow the pattern exactly and then be disappointed when it doesn't fit" method. My last, tested, workable method is the "follow the pattern to baste together a muslin, try it on, take it apart and make adjustments; repeat, repeat, repeat" method, but it is very time-consuming. With this book I still made muslins and still did some adjusting, which often meant re-drafting my pattern slightly, but I was amazed by one simple fact: Every muslin I made fit, pretty exactly, on the first try.

DIY Kathy dress 4
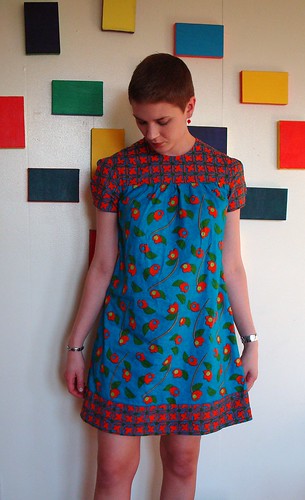
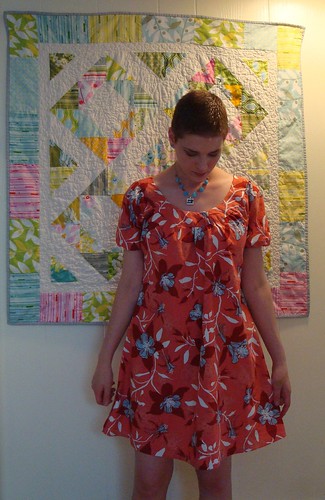
Which it should, right? Since Cal (we're on a first-name basis at this point) teaches you how to draft your own patterns--from scratch!--using your own measurements. I bought a 36" wide roll of newsprint last week and spent plenty of time on the floor this weekend drawing, erasing, measuring, etc. but it worked really well. The first thing I tried was actually the last project in the book: the Kathy dress. Because it was the last project in the book and the projects build on one another, I actually had to back track to the shirt chapter and draft the shirt and sleeves from there, then move on to a different dress to make modifications, and then modify that pattern to be my Kathy dress.

DIY Kathy dress 8
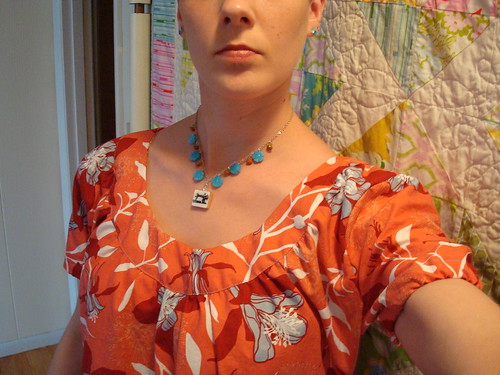
I am in love. The shoulder/armhole probably could've been gathered and definitely needs to be re-drafted, I accidentally cut the pockets into the back because I was rushing, the sleeves could be pouffier and might need to have the elastic gathered by another inch or so, but at this point, I don't care. I love this dress. The fabric is a Joel Dewberry, from one of the older lines (Deer Valley?), that I bought on a whim. The necklace was made for me by my friend Katie.

village skirt 3
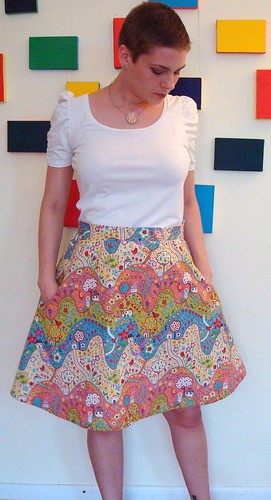
After that worked out so well, I made the Phoebe skirt, also at the back of the book. It's just a slash-and-spread version of the standard A-line skirt (for which my muslin turned out beautifully!). I used this really fun village print (Robert Kaufman?) and added the pockets to the FRONT this time. I didn't topstitch the pocket opening or stitch the pocket to the front of the skirt, but they are a little floppy, so I'm thinking about doing some hand-stitching in a thicker thread, รก la Anna Maria Horner.

SMS skirt front
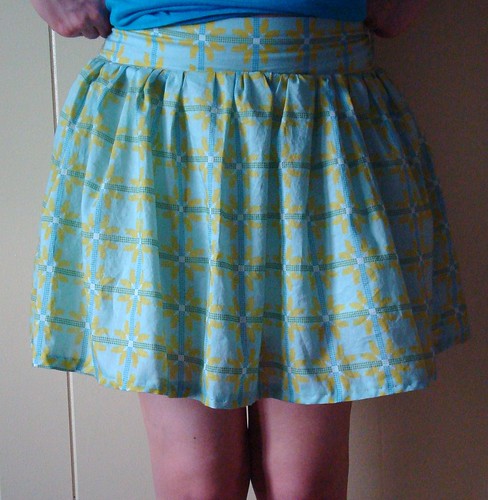
All this to say that I am very very pleased with the Cal Patch book and I fully intend to revise and adapt the patterns in it--I'm seeing a giraffe bubble skirt in the near future. It was so great to make clothes that turned out (despite some small imperfections), especially after I had a craft fail with the Sew Mama Sew! skirt tutorial. Like others I've seen, my skirt came out too small on the waist and too mini on the length. The length is my fault. The waist fits, but without a zipper, I have trouble getting the skirt on and off over my hips--a standard 4" is added to the waistband, but I guess my hips are a bit larger than that. Hmmm. Also, the pockets are too small! BUT I did learn how to shirr with elastic thread, which was super cool. I'm just bummed that I wasted a yard of the lovely AMH voile on this. I guess I'll just chalk that one up to "learning experience" and rely on my handy Cal Patch book for evaluating any new patterns before diving in.

Thursday, June 24, 2010

Disappearing nine-patch quilt finished!

AMH DNP 1
It's done! (Okay, it's been done for a few weeks now, but still...) I first posted this finished quilt top here, way back in March. It had been sitting, finished, for months while I worked up the courage to quilt it. See, the problem was that I knew this quilt needed something curvy, something free-motion-y, to finish it. You may recall my first attempt at free-motion quilting with Gloria. Not. Good. That is what made me so nervous about quilting this one (and why I opted for straight-line quilting on this quilt). However, between that first attempt and this one, I shelled out $$ for the Sew Steady table and the spring/hopping free-motion foot for Gloria. I don't know if either one of these changes--or both together, along with some adjustments to my machine's settings--made the most difference, and I don't care! I took the Friday before Memorial Day off work, got up early, spray-basted the quilt, then sucked it up and started quilting.

AMH DNP 3
I just want to say that, despite our differences up to this point, I am in LOVE with Gloria's quilting! It's phenomenal; I can't even remember how I was able to quilt such large projects on my Brother! I am now a curlicue free-motion quilting machine! As you can see above, I opted to just do an up-and-down curlicue straight across the quilt, with the row centers being about 5" apart (I think--I can't remember. I know that I did use a chalk liner to mark the baseline for reference, so my rows didn't move at an angle as well).


AMH DNP back 1
Here's a shot of the back so you can see the quilting a little bit better (there are more pictures on my Flickr page, too). I kind of like how the non-quilted parts pop, too. It's just another layer of interest in this quilt. For the back I used a Kona solid (I think it's Coal, but could be wrong) and pieced in a row of disappearing nine-patch squares made from the leftover fabrics from the front. The quilt finishes at about 48" x 60", so I needed a little extra width on my backing fabric and thought that would be a fun touch. The quilting was done using my standard Mettler gray piecing thread--not quilting thread. I was concerned about how the fmq would go, so I opted not to use a heavier quilting thread, just in case it was jerky and I hated it.

AMH DNP back 2
I really like everything about this quilt. The fabrics are gorgeous. The thread I used for quilting lays down on the top really well and doesn't distract from the lovely voile, but provides just enough contrast with the backing solid to really show off those curvy lines up close. The slight wonkiness of the quilting is perfect. Just the experience of quilting this was lovely. Rob can vouch for it--I was full of giddy excitement the entire weekend because the quilting turned out so well! Trust me, there will be plenty more fmq projects coming up!

Tuesday, June 22, 2010

Baby gifts

Lowell booties and doggie
A good friend of mine has a baby that is going through a tough time right now, so I couldn't help but put together a little package of handmades to make baby (and mom) feel a little better. (Plus I had a new bootie pattern I wanted to try out!)

Lowell booties 1
The booties are from Anna Maria Horner's Handmade Beginnings. I've previously made baby booties following the pattern in Amy Butler's Little Stitches, but I like these better. For one thing, they seemed to come together a little bit easier/quicker without all that fussing with velcro and many many layers of interfacing. For another, I think they're just as cute. Anna Maria's pattern doesn't call for any hand-stitching, instead telling you to fuse the insoles into the bottom of the booties, but I had trouble with that. I ended up blind-stitching the insoles in to the lining, just to make sure they stayed in place.

Lowell booties 2 bottom
I made the booties in the 6-9 month size and the 9-12 month size. For the largest size (pictured above), I used a textured fabric for the sole to give baby a little bit of grip for scooting around. The grippy fabric was really inexpensive at my LQS and easy to work with--I'm glad I tried it out for this project.

Scottie dog 3
The Scottie dog softie was made following this (free) pattern, with a few modifications. I reduced the size of the patchwork squares slightly, to 2" cut, because I wanted my doggie to be more baby-sized than the one in the pattern. I had a much more difficult time than I thought I would stitching the gusset around the dog! Those corners were really tricky. Instead of using buttons for the eyes, I blanket-stitched on some felt circles. I get so nervous using buttons on baby things! (I used quilting thread to stitch the buttons to the booties, and even then stitched each one a good 20 times, just to be safe!)

Hope you like it, kiddo!

Thursday, June 17, 2010

Gifted: Little Red Riding Hood quilt

V quilt 1
My friend Vanessa loves Little Red Riding Hood. Vanessa is super amazing and sweet and generous; Rob and I knew her in another life (undergrad) and fate moved her halfway across the country to be our neighbor! Rob and I are car-free, and Vanessa has been sweet enough to take us all over the place for groceries, vet visits, literary road trips... you name it. I'd been wanting to do something special for her, and she just had a big birthday, so a Little Red Riding Hood quilt seemed perfect.

I on V quilt 7
The main fabrics are Kokka prints that I bought from Superbuzzy. I supplemented them with Kona solids in a variety of shades, including bone, and one Nicey Jane print that coordinated perfectly. The layout was inspired by this amazing quilt, though I fussy cut the scenes and ended up with larger--and fewer--blocks for my version.

V quilt back
For the back I strip-pieced what was left of the Little Red fabrics and the solids, then stitched them all together. The quilt ends up nearly reversible! Except for the label, which was actually a reject block that I embroidered around:
V quilt label
I really love that bit. The whole thing was quilted in random lines--some straight, some slightly curved. I did my best not to decapitate any Little Reds! I like the final effect, though I now wish I had decided to bite the bullet and free-motion quilt some of this (more on that later). Still, this is probably the most modern quilt I've ever made, and it was definitely well received!

Tuesday, June 15, 2010

My block party blocks

25th block March

As I posted last, I received all of my March Tethered Threads blocks, putting me at an even 24. I plan on setting this quilt 5 x 5, so I made the 25th block, pictured above. Since I had everything out, I figured I'd lay out all 25 blocks and see what they look like together:

March blocks laid out

What say you? I'm a little embarrassed to admit this, but.... I don't love it :( I certainly don't hate it, but it's not love at first sight, you know? It just looks much crazier than I thought it would. I mean, I love sampler quilts! There are so many cool block party quilts out there! I'm just afraid this isn't one of them... but the thing is, I love all of the individual blocks! The ladies in my group did a really great job! I just don't know how to make those great building blocks (pardon the pun) equal an amazing whole.

Iris on March blocks 2

So, where do I go from here? Suggestions?? I was originally planning on building each row with pieced sections around the blocks, so that the blocks are off-kilter. I thought that the wonkiness of the blocks would lose something if I sashed the whole thing with a solid grid. But now I'm wondering if that might be the way to go. Thoughts?? HELP!

Wednesday, June 9, 2010

Catching up: Tethered Threads block party

May blocks
Time is still flying by, and I'm so behind in posting! Ack! Here's a quick catch-all of the blocks I've made for my Tethered Threads block party. The blocks above were made in May for Jessica, who requested blocks following tutorials from Modify Tradition. She's making a modern sampler quilt--so cool! I really love this idea, and am still so in love with those Nicey Jane fabrics!

Blocks for Wendy
The blocks above were made in April for Wendy, who requested some Ticker Tape–style blocks. I really love the look of these, but they were SO time-consuming to make. Glad I only had to make two!

Rebecca blocks
And last but not least, I received all 24 of my March blocks! These above are from Rebecca and came all the way from New Zealand!

Kathy blocks
And these are from Kathy. Love them all!

Tuesday, June 1, 2010

Catching up

*sigh* I am so far behind in my blogging / blog reading / Flickr updating that it's not even funny. It's ridiculous, really. Though I guess the good thing is that I have been crafting even if I haven't been keeping up with it on the blog! So, anyway, this will be a little bit of a catch-all post so that I can move on to more recent pictures. Everything in this post has been done for at least a month!

birthday dress 2
First up, pictured above (and being worn today), is my birthday dress! My birthday is April 8 and I finished the dress just in time. I used pretty much the same pattern I did for this dress, but changed it up a little bit. Instead of using elastic in the sleeve hem, I did a little pleat at the shoulder and at the bottom of it. I also cut the dress pretty short, then added a contrasting band hem the same way you would stitch on some double-fold bias tape. It was chilly on my actual birthday, so I wore the dress with some knee-high black boots to this bit of amazingness (which was nothing short of awesome). I even got a, "That is a sweet dress!" from the funky girl behind me at the show, which was super sweet.

DJ G2
Next is another Dear Jane block: G2. This one took a while because it has 28 (!!) pieces! But it's a pleasure, as always. I am now 16 blocks down, too many more to go.

linen patchwork bag 3
And last for this post is the cosmetics pouch from I Love Patchwork! This was a quick and satisfying project for me. It is a great size and came together really easily. It now holds all of my hand-stitching stuff, which I should really commit to using more often and making more progress on my Dear Jane.

Hopefully more posts TK later this week. I had a lovely and productive long holiday weekend, which is now screwing up everything else!