Tuesday, February 15, 2011

Dear Jane Progress!

4 DJ 2011
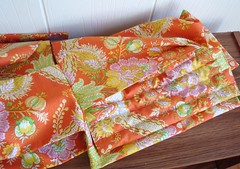
Earlier this year I wrote in this space that I wanted to try to commit to making a lot of Dear Jane progress this year (there's a lot of qualifying language there, I know, and that's on purpose). I'm happy to report that, so far, I've been making progress! Above are the four blocks I completed between the beginning of the year and 2/5/11.

DJ G1
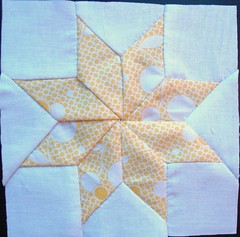
First was block G1. Piecing the curves was trickier on this one than any of the other curved blocks I hand-pieced, and I'm not sure why. I clipped the seam allowances quite a bit, though, and that seemed to make the difference.

DJ G7
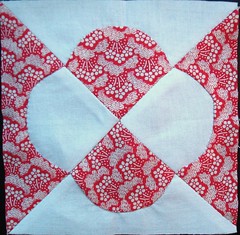
Next was block G7, which I was a bit hesitant to start: It's the center block! These curves came together a bit easier than the previous block.

DJ G8
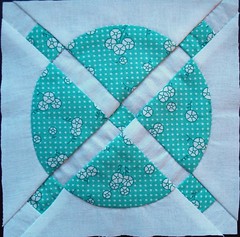
Then I pieced G8, which was also a little tricky with all those inset seams, but much easier to deal with by hand-piecing than by machine!

DJ A1
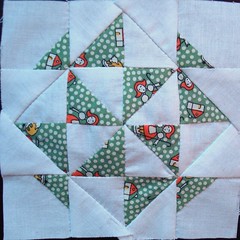
Last was block A1. Up to this point, I'd been skipping around in rows A-G, piecing the blocks I thought would be simpler first. However, I've skipped most of the appliqué, and know that if I don't go in some kind of order, I'll be left with all the tricky ones at the end. I've nearly exhausted the blocks I had prepped in previous years (it seemed to be easiest to cut for a handful at a time), and I've since learned the back-basting appliqué technique, so from this point forward I am going to work in order, starting with row A. This block has 32 pieces, the most up to that point!

Here are my totals, as of 2/5/11: 20 blocks completed, 290 pieces total. There are more in the works, though, so stay tuned! If I can complete my goal of 50 blocks this year, that means that by early 2014 I can have the center of the quilt finished! Then it will be on to the triangles... This is a marathon, people, and I'm so happy to be doing it.

Monday, February 14, 2011

Gifted: Obi-inspired hot/cold wrap

Gramma obi wrap 2
I've made yet another of these obi-inspired hot/cold wraps from One-Yard Wonders, this time for my Gramma Mary's birthday gift. I had a hard time figuring out what to make for her gift, and then when my mom told me she is trying to pare things down to what is really useful (as opposed to just decorative, like the doily I was considering crafting), this gift seemed perfect. I really love this fabric; I think it's an Anna Griffin print? It has a nice, soft hand.

I'm heading out of town soon, but I hope to get in a Dear Jane update before I leave. I don't want to say too much yet, but will announce that progress is being made!

Friday, February 11, 2011

Gifted: Koji monster

Koji monster 1
Here is another project from Wee Wonderfuls: the Koji monster, which turned out to be the perfect birthday present for my super amazing and famous friend Kate! (Seriously: read her book; it's awesome!) Once again, I followed instructions as written and, for the most part, this guy turned out perfectly! I did have trouble, like a few others, getting the bottom to fit, even though I sewed dot-to-dot as instructed. I fixed this by stitching a little extra on the legs, which made the bottom "hole" smaller, and everything worked out fine.

Koji monster portrait
Seriously, this picture? Just. Kills. Me. I love it so so much! That face is just full of personality. Enjoy your new monster friend, Kate! I think he's found the perfect home.

Monday, February 7, 2011

Baby shower gifts

Fae gift
It seems like everyone I know is expecting! That means a lot of baby gift crafting for me, but despite not really liking children and planning to remain childfree myself, I don't really mind making for babies. For one thing, I think it's important to surround babies with lovely handmades, and for another, those handmades are usually small, which makes them fairly quick projects. I'm thankful for a couple books in my craft book stash to help me out in times like this: Anna Maria Horner's Handmade Beginnings, and now Hillary Lang's Wee Wonderfuls. The above gift, for baby Fae (who came 5 weeks early, so it was actually crafted a couple of weeks after her birth) includes projects from both books.

Fae booties
I've made these booties a few times already, but they are such a great go-to project, and they're so small that they come together quickly. I'm still hand-stitching the insole to the booties; I just can't get the fusible interfacing to work the way it should, according to the book. But, like I said, they're so small that the hand-stitching doesn't take that long, and it ensures a really nice finish, so I'm happy to do it. For these I used a super soft corduroy for the outside and a bright orange solid for the inside. I think they look adorable and sophisticated!

Fae doll front
The doll is my first project from the Wee Wonderfuls book. I have to admit, I didn't want to get the book at first. I'd flipped through it and decided not to--my original thought was that it was too doll-centric and I prefer to make animal softies instead. However, I re-joined Crafter's Choice (it's a sickness, I tell you!) and got it as part of my introductory package, and I'm so happy I did. It's true that the book is mostly dolls, but I'm now realizing that dolls are just as great as animal softies! This little girl is one of the three sleepover pals (and, I should mention, my brother isn't even married yet but I am so hoping for twin nieces so I can make them each a set!!) and I just loved making her. She was really easy to put together; I followed instructions as written except I machine-stitched her lace collar on before sewing the halves together. It did take a bit of time to finish her, though--there is a lot of hand-stitching involved with the arms and the hair, and stitching around both twice to ensure they won't fall off, but it was totally worth it. I definitely see more of these in my future!

Leah baby sleep sack
For an as-yet-to-be-delivered baby girl, I made this sweet sleep sack from Handmade Beginnings. I saw that my friend had registered for some plain ones, so I thought a patchwork one lined in super-soft flannel would be welcome. The patchwork is made up of 2.5" squares and actually took a really long time to cut, lay out, and stitch together. The rest of the sack came together quickly--I think I spent the most time sewing around each piece of Velcro twice.

Leah baby sleep sack detail 2
I didn't want to make my own bias tape, so I used some I had on hand, but it was much skinnier than what the pattern called for. I'm not sure if that's why the top is a little ripply?? In my card I told my friend that when the baby outgrows it she could return it to me to have the patchwork repurposed into something for the nursery (I was thinking a little pillow, maybe, or an embroidery hoop hanging with the baby's name stitched in it). I have a feeling I won't be getting this back again, though--my friend's mom saved most of her baby clothes, which are being passed on to this new baby. It was so amazing at the shower to see the handmade Strawberry Shortcake dress from thirty years ago!

Saturday, February 5, 2011

Christmas recap, part 2

mug rugs 2

And now, finally, a continuation of my run-down of the handmades I gifted this year. First up: mug rugs and hot cocoa mix. These were gifted to the four guys I work with in my office. Only some of us give gifts, and I love to do it, but I always try to keep the gifts uniform (or variations on a theme) and give them all something small. Here is a really horrible photo of the gifts I made a few years back. So, anyway, this year the guys got mug rugs made with the same fabrics (scraps of the Folksy Flannels I used for these, plus some gray Kona in my stash) as well as a small jar of my mom's own hot cocoa mix. I was pretty pleased with this idea; it came together pretty painlessly, and the guys all seemed to appreciate the gifts. Bonus!

Nessie bag 2

Next, I made a special gift for my friend Vanessa, who is a neighbor and a longtime friend (from ten years ago already!) and who does so much for us. I knew she wanted a new bag, so a while back, when she took me to Ikea, I had her pick out some fabric. She chose this great wood print, which is an upholstery-weight cotton but is not "canvas"-y feeling, if you know what I mean. I designed this bag myself so that it could be made with half-yards of fabric, though in the end I wonder if it's a little bit too small for my own use? I need a new bag for myself, but have yet to finalize the pattern I will use.

Nessie bag inside

Anyway, for my Nessie Bag, I used a LOT of interfacing: fusible fleece throughout, plus heavyweight for the top bands to help give it shape. I also used fusible fleece in the straps because I thought it would add to the comfort of carrying it around all day. The lining is this great red floral print I picked up at my LQS; it really pops against the black and white of the outer print.

Sophie mouse

Last were the gifts I made for my parents. I knew they were going to be adopting a kitty in early January, as soon as their holiday visit to us was through, so I made a little catnip mouse. I like to embroider these with the cat's initial, but since there was no cat yet, I embroidered this sweet little snowflake instead. (The kitty is Sophie, a 3-yr-old rescue from their local shelter, and it sounds like all three of them are in love! Aww.)

Mom wallhanging 1

My mom had purchased some new art to hang in her sunroom, but needed something else to go on the wall and said she'd like a quilt. She gave me some dimensions to work with, and I decided to make this wall hanging close to the same dimensions as the framed picture she has, only vertical instead of horizontal.

Mom wallhanging detail

This quilt was completely and totally inspired by this one, the elegance and simplicity of which I fell in love with as soon as I saw it. I made mine similarly, using raw-edge applique for the two rectangles on the top, and quilting with straight lines about 1/4" apart. Even though this was a simple project, I really wanted to push myself to make it unique, so I tried my hand at fabric dyeing; the entire quilt is made from the same white fabric, but the tan ones were dyed using coffee grounds, about 8 tea bags, and some red vinegar. I followed the instructions provided by a number of tutorials online. I'm happy with the final color of this, but I guess I'd wished for more variety in the fabric and not such an even color. I have plans for some more dyeing in my future, so we'll see if I can achieve that textured look with my next project.
That covers my holiday handmades! Next up: baby gifts!