Friday, December 16, 2011

Peony dress!

Peony dress 2
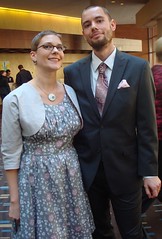
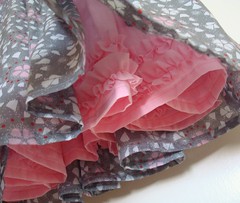
Wrapping up the wedding posts, finally... I made myself a Colette Patterns Peony dress to wear to my brother's wedding rehearsal. I had made myself another version of the Socialite dress and did wear it to a different wedding (though that's another post), but at the last minute decided I wanted a Peony instead. So I scheduled myself one hour of work between getting home from my day job and making dinner for two whole weeks. I was able to get most of it done, but because I decided to fully line the dress, I completed sewing the lining to the zipper on the plane and the lining to the arm holes in the hotel room! Still, I finished in time to wear it to the rehearsal! Go me.

Peony dress back
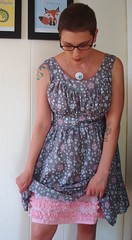
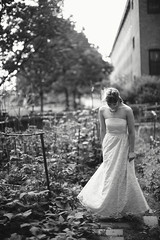
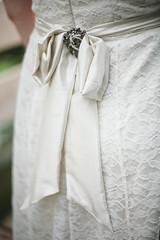
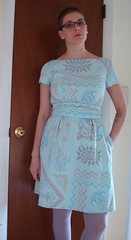
I knew when I saw the Anna Maria Horner Needleworks fabrics that I wanted to create something out of them that wasn't just needlepoint. I was going to stitch on the little cummerbund belt, but ultimately decided it would be too much. I left the fussy-cut sleeves unlined, however, so that I could add embroidery / cross stitch if I wanted to over time.

Peony dress 3
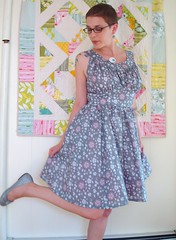
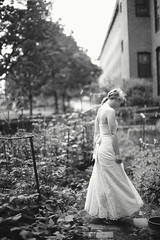
I really like this dress! I think it's gorgeous but casual. It has pockets! The little belt does wonders.

Peony dress 1
Despite the simplicity of the pattern, I had a few issues with creating this dress. I did my first full-bust adjustment, and it certainly shouldn't be my last! It took a bit of time, though. And then, somehow, I messed up the bust dart on one side. It's curvier than the other, and without the belt looks absolutely awful. I also think I made the belt a little too snug, as it actually gathers the dress a bit at the waist. It takes some fiddling to get it looking right, but then I'm set all day. I think the next time I make it, I should either take the belt out or the dress in or both. And fix the bust dart, because I would like the option of wearing this belt-less. I have a holiday version in mind with longer sleeves, so here's hoping I can get to it! Things have been INSANE the last few weeks, both at my day job and at home / crafting.

rehearsal Peony 3
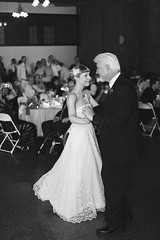
Anyway, if you'd like to see the full album of family wedding / Cincinnati pictures, go HERE. (And yes, that photo above is me trying to document the dress pre-rehearsal, in the hotel room.)

Tuesday, November 29, 2011

Wedding Chantilly

us wedding day 1
Finally--the dress! Above is a photo of Rob and me taken in the hotel lobby before my brother's wedding. I finished the dress way back in September and knew that I wouldn't have the time or resources for a proper photo shoot on the actual wedding day, so I had one at home when the dress was finished. Just so I could show you the details I love!

wedding Chantilly 4
This is, again, the Colette Patterns Chantilly dress, the same pattern I used for my birthday dress. I really love this pattern. There is a LOT of hand-gathering so it takes a bit to cut out and construct, but it is SO worth it.

wedding Chantilly 1
I used an Innocent Crush voile (possibly my favorite print/fabric to come out in the last few years; definitely saved for this special project!) by Anna Maria Horner for the outer layer and a light pink cotton lawn for the lining. The dress is really lightweight and floaty, but it's still a lot of dress! Or, skirt, rather:

wedding Chantilly twirl

wedding Chantilly 3
This version has pockets, which is awesome!

wedding Chantilly hem 2wedding Chantilly underskirt 1
I also wanted to make it a little more fancy than my previous version, so I added two rows of bias ruffles to the hem. It's a little trick I learned from this book. It pushes out the lining just enough; not as much as a petticoat would, but I didn't want to steal the show, plus I wanted to keep the dress wearable to the office and more casual functions.

me wedding Chantilly 1
Bottom line: I adore this pattern and highly recommend it for a party-feeling dress! I also want to note here that my jewelry is by Stonehouse Studio and I really really love it. I can't decide if I like the necklace or earrings more...

Friday, November 11, 2011

Bridesmaid bags

A bags side
*sigh* I always have the best of intentions with keeping this blog more updated, but it always gets away from me. If you're still reading me in your feed or checking back for updates, thank you for sticking around!

As you may have noticed, it was wedding central with a lot of my summer crafting. What you see above are the six bags my future sister-in-law (now ACTUAL sister-in-law!) commissioned me to make for her bridesmaids. She really liked this spring tote I had made previously (using a pattern from Stitch magazine), but it needed some adaptations. Anne wanted the bags to be large enough to hold a pair of flip flops, a bottle of water, and other assorted necessities.

A bag inside
I took the same general shape and made a few dummy bags, eventually deciding on one that was about 15" square, then rounding off the bottom corners. Because the bag was smaller, I wanted to reduce the number of grommets in the top, too, but that posed some issues as well: How was I going to get the strap to be outside in the right places? I fixed this by adding a small channel on the insides to thread the strap through.

A bag tag
Anne chose all of the fabrics to go along with their wedding colors of purple and silver. I machine embroidered initial tags to go on each of the straps. They're completely removable, but I figured six girls with similar bag contents would want an easy way to tell them apart!

A bag all 6
This project was a bit more time-consuming than I initially thought, what with us changing fabrics a few times, adding the strap channels, and then all that hammering to insert those grommets! Still, Anne was incredibly gracious and complimentary about them. After she gifted them to her bridesmaids at the rehearsal dinner, most of them came over to hug me and thank me for the bags. And then, while we were hanging out in the church before the ceremony, one of the photographers came over, asked if I was Tim's sister, and then complimented me profusely on the bags! It was so so sweet, and a much-needed boost of confidence before I had to get up in front of all those people and do a reading during the ceremony!

So, while these bags are grand, I still have to show you my dress and jacket for the wedding! I wasn't in the bridal party, so I was able to craft my own.

Also, Hilary and I will be vending at the Holiday Craft Market in Beverly TOMORROW! If you're in the Boston area and would like to come out, we'd love to see you! You can see a peek of our wares from our recent farmers' market table (and me freezing my butt off outside) in Hilary's Flickr stream here.

ETA: I am in love with all things Colette these days, but I just adore this post! I think Sarai is doing everything right and can't wait to get my hands on her book!

Tuesday, November 1, 2011

I took a workshop... and a bloat of hippos

bloat of hippos 6
Wow, time is flying! And I'm not posting. I mentioned in my last post that I was going to discuss an amazing workshop I had taken that past weekend, and now it's been 2+ weeks since it finished and not even a peep from me!

bloat of hippos 10
Well, better late than never, right? I first heard about this workshop via Elise's blog post about it. I had never actually met Elise, but I had seen her around (we live in the same 'hood) and had bought some of her cards and a fantastic Foxy Like a Crafter tote, which inspired my birthday party this past year. So, yeah, I'm a fan...

bloat of hippos 13
Anyway, the class sounded like exactly what I needed to get my little business going, so I signed up. A few days before the class started, my partner in craft, Hilary, signed up, too! Together, we had the best time that weekend. Really and truly. We emailed each other on Monday to say how bummed out we were that class was over and how spoiled we had been to spend a weekend with other creative people, talking about our art and being inspired. It was such a treat! Elise blogged a bit post-class here, so it sounds like even our instructor enjoyed it.

bloat of hippos 15
I came away with a notebook more than half full of inspiring tips and must-do lists. I have decided that YES, I do want to open an Etsy shop, and I want to do it right. I'm hoping to launch the official Kitty Kitty Crafts store in early 2012, but there is so much I need to do first! Still, now I have some great checklists and the tools I need to take the first steps.

bloat of hippos 1
Once the class wrapped up, I spent the entire next week working on inventory for a farmers' market booth (failure, but that's another post), and then rushing through a version of Colette's Peony dress, just in time to wear to the rehearsal of my brother's wedding last weekend! I spent five days in Cincinnati celebrating with family, and now that I'm back, I'm absolutely exhausted! BUT now that the wedding is over with, all of my top secret still-marked-as-private Flickr photos can now be revealed! Look for more posts coming soon.

All hippos in this post are stock for my upcoming holiday show, Nov. 12! If you're local, I'd love to see you there!

Tuesday, October 18, 2011

Just to say...

This is a quick post just to point out this wonderful article from the Salem Gazette about Maureen Clark, my LQS owner and a woman I am proud to call my friend. She is incredibly warm, kind, and generous of spirit--to everyone, but especially her customers. We adore her! It was so disarming for all of us to learn that she has breast cancer. I am so happy at the way our little community of quilters has rallied around her.

I think Maureen says it best, as quoted in the article: “The community I’ve found here, all of whom come from different backgrounds but all brought together by their love of fabric arts, have been my therapy,” Clark said. “I’ve taken so much comfort from them.”

(The photo above is of Maureen, myself, and Melynn, who was also quoted in the article. It was taken at the end of a long and very very fun night of debauchery.)

Back later this week with a post of a different sort about an amazing workshop I took last weekend!

Tuesday, October 4, 2011

Another bird mobile

Jenne bird branch 2
I've now made a few of these, but that doesn't make me like them any less! This was made as a baby gift for a friend of a friend (as in, my friend Hilary asked me to make this for her to give to her friend Jenne). I went with bright colors and kept the birds on a branch that could be wall-mounted or hung.

Jenne bird branch bird 1
This was done in a bit of a time crunch, so I pieced the birds by machine instead of by hand, as I'd done for all the previous birds. I was pleasantly surprised at how well, and quickly, they came together!

Jenne bird branch birds
Congrats on your new baby girl, Jenne!

Monday, September 26, 2011

Wedding flowers

H flower O bout
On Saturday, Rob and I attended the sweetest wedding ceremony! My co-worker and friend Oliver and his lovely new wife, Hilary, had a short and sweet ceremony followed by some fun signature drinks, delicious dinner, and lost of dancing! (okay, we didn't dance very much because we overdid it on the drinks earlier in the evening...) It really was one of the nicest events we've ever been a part of. Weddings are so affirming, you know? Of the love of the new couple, but also of your own. We held hands and beamed through the entire thing.

OH bouquets
Oliver and Hilary did everything on a very tight budget, and so they called on a lot of their friends to help out. I happily volunteered to do fabric flowers for the couple, without really knowing what I was getting into (!) We chose to use the same Radiance cotton/silk blend I used for this wedding dress, though went with pure white for the bride and a lovely rust for everyone else, as this was a fall wedding.

OH corsage
For the bridesmaid bouquets, I followed this Martha tutorial, which was super easy! I also made five pinnable corsages for moms and special wedding assistants using the same method.

OH bouquet 2
I had some trouble with the stems being sticky once I wrapped them in floral tape. I did some Googling and ended up testing the baby powder method, and it worked! Thanks, internet! Still, I wrapped a little ribbon around the bouquets to bulk them up a bit and give the girls something to hold on to.

H bouquet 1
Hilary's bouquet was a bit more challenging. She had seen a similar large bloom bouquet online and requested something like that. For the most part, I did the same thing as for the smaller flowers, but with many more layers and varied sizes. The problem was, the flower kept wanting to collapse on itself. After a bit of experimentation, I made a subtle cone out of a heavy interfacing and then sandwiched it in between the two outermost layers, which I tacked together at the top of the petals so the support would be invisible.

H bouquet 3
Figuring out how to make the stem was possibly the hardest part! I had stitched the petals onto four floral wires folded in the center (so it was eight wires thick), but that created a hinge at the top and made it easy for the flower to flop over. The solution? A skinny PVC pipe, which I glued to the flower at the very top, and then a 8" piece of a large-diameter hose over top of everything. I then wrapped that in more floral tape, then added some pretty ribbon and bits of vintage lace.

OH boutonnieres
For the boutonnieres, I also went with Martha. We used a lovely wool suiting, but it was a bit ravel-y when cut on the bias, so I used fusible web just around the outside to make them behave. We needed some color, so I made a little tube of fabric, inserted some floral wire, and made a little twist. Then I wrapped it all up with some brown ribbon to match the bouquets.

OH wedding flowers
I was ridiculously excited on Saturday when we got to the venue and I saw the groom's dad walking around with his boutonniere on! They looked SO good on all the guys. Hilary and Oliver were lovely and glowing with happiness, and that bouquet when they walked down the aisle...gorgeous! All told, supplies for all of these flowers was under $50. I was reimbursed for materials, and also gifted the most amazing bottle of tequila as a thank you. It really was my pleasure; coming up with solutions to those crafty problems was just a bonus. Congratulations, Oliver and Hilary! I am so thankful I could be a part of your day!

Thursday, September 22, 2011

Hippos galore!

Edited to add: These are now for sale in my shop on Etsy
hippo pyramid 1
I've been keeping busy behind the scenes with a lot of wedding-centric crafting for others that I can't show you yet (soon!) and a couple new batches of hippos for some upcoming craft fairs I'm doing. These were "born" in early September, and I rushed through taking a bunch of photos so I could make some new hippo-centric business cards! That was fun.

fish hippos 2
Anyway, here are a few more photos of my little guys, which I love so much! I'm trying to amass as much inventory as I can as quickly as I can, because October is going to be crazy, and then I have two shows! However, people keep seeing these and asking if they can buy one, or two, or three... I'm having a hard time saying no!

3 hippos 

my folklore hippo butt 1 
 my folklore hippo butt 2
Also, did you notice? I had tags made! At the recommendation of Ronit, I worked with Michelle at Inked Papers and I'm incredibly pleased at how these turned out! I think they make my softies look that much more professional, so they were definitely worth the investment (though I only had to pay for the printing; the design was done by meeeee!)

Unrelated: I have a lengthy, rambly interview up with my friend Gregory Sherl, who happens to be one of my favorite poets, here. It's incredibly verbose, so don't say I didn't warn you!

Friday, September 16, 2011

Giraffe!

Giraffe 5
I made a new softie: a giraffe! This was a birthday gift for my friend JJ, who I also made these guys for a few years ago and this guy even longer ago. She's got a regular collection of my work!

Giraffe walking
(this picture of him walking just kills me)
I'm happy to report that this is an original design of mine! It didn't come together as smoothly or quickly as the hippo; I had multiple versions that were too sea-monster-y. I'm still not sure the scale works in relation to the hippo, but I was pretty pleased with how this guy turned out! Even though there will be more tinkering in my future.

Giraffe 3
I have sewn quite a few softies from a number of different patterns, and one thing I absolutely HATE is sewing in foot pads. I find it horrible. The pieces are so small, the seams are never smooth, it's a fight to turn everything carefully under the presser foot... Blergh. So when I decided to design my own giraffe pattern, I first had to figure out how to deal with the feet (I used a different, easier method with the hippos, and a more intensive hippo post is forthcoming, I promise!). Here's a detail shot:

Giraffe feet
So, yep, pretty pleased. There are some more silly shots of him in action on my Flickr page.

Also, something I forgot to mention previously: Chrissy, whose wedding dress I made and blogged about here, posted her own take on the experience here. Click over for some really exciting pictures of me ironing, some ridiculously cute pictures of my cat, and Chrissy's write-up of the incredibly sweet thank-you gift she made me.

Psst! This is my 300th post! Yowza!

Monday, September 12, 2011

Dear Jane catch-up

DJ C7
I *was* caught up on my Dear Jane blocks... For about 2 seconds. Now I'm behind again. But I did hit another milestone: row C is done and pieced together and stashed away! What you see above is block C7, which has 45 pieces and I finished on 7/31/11. I'm still not happy with the points of my diamonds, but I'm not going to redo any of them, either! Finished is better than perfect...

DJ C8
Here's block C8, which I love so so much! I think it's that gorgeous background fabric, which I'd gotten in a swap long ago. So pretty!

DJ C10
Block C10 was pieced in one day, in which it rained all day. It took me the whole day, too!

DJ C11
I finished block C11 on the Amtrak on the way to Maine for a mini-vacation we took last month. It was lovely, and I like the outcome of this block, even though I don't really love the fabric. It was also a swap extra from years ago, and I finally decided to put it to use somewhere.

DJ C12
Here is block C12, which has the most pieces yet, at 49! Wooo! This one took a while. I started it on our Maine vacation, but didn't finish for another week.

DJ C13
And here is C13, which I had a difficult time with. Jane's block has blue in the corners, but it's not pieced. So far, I have only used one focus fabric + my Kona white in each block, and I didn't want to change that for this block only, so I found something with a darker color in it (the green leaves) and fussy-cut the pieces so they would appear in the corners. I am actually quite pleased with how it turned out--pops of green in the corners give the same kind of effect, but I didn't add additional pieces or fabrics.

And with that, I've shown you all of my finished blocks to date! I've been working on other things and am at least 2 blocks behind again already (boo). Still, as of 9/2/11, I have 50 blocks done, and I'm at 989 pieces! Wow.

Wednesday, August 31, 2011

I made a wedding dress.

CK garden 3
All photos in this post (c) Lisa Rigby Photography (doesn't she do fantastic work?!)

Let me say it again: I. Made. A. Wedding. Dress! This is the first time I'm posting about it (beyond here, where I alluded to starting this project, and here, where I blogged the bag) but it's been done for a few months now, since the wedding was in the end of June!

CK in dress
What happened was this: an acquaintance who is a friend of a friend contacted me about helping her hand bind her wedding invitation books, since I've done my share of bookbinding (little-known fact!) At the end of our dinner of brainstorming and beers, she asked if I'd ever made a dress on commission. By that point I had a buzz going and was feeling super amenable, so even though I was hesitant, I heard her out. She had a very small budget and just couldn't find anything in her price range. What Chrissy wanted sounded simple enough: a strapless, A-line dress. I can manage that! With a full-on lace overlay. Ooh, maybe not so much...

CK garden 1
But I agreed to look into it. The next day I did some research into fabrics and patterns, and decided that if she was okay with the inexpensive lace, plus if she would hang out at my place while I made it, it would be a project I was willing to take on. We ordered fabric swatches and a pattern (which I can't find online anymore??), and I got to work.

CK garden 2
The pattern had two skirt options: a floor-length sheath with a slit, or a tea-length A-line skirt. I ended up grading the top and bottom, since Chrissy's measurements varied a little, and then re-drafting the bottom to be floor-length but the same circumference as the tea-length A-line. Did you get all that? I then went through 3 rounds of muslin for the bodice, which was tricky, of course.

CK dad dance
I wanted the lace overlay to be separate on top of the skirt, so I used French seams to hide the raw edges. I also cut the pieces as best I could to preserve the scallop that was the selvage. You can see a pretty good shot of it above. (Yeah, I'm doing a little back-patting right now!) But I layered the lace on top of the cotton-silk blend for the bodice because I knew fewer seams and bulk was better. Hence the sash at the waist, which covered up that transition.

CK dress back
In all, I'm super pleased with the outcome, and so was Chrissy! Rob and I were invited to the wedding but didn't go, partly due to logistics, and partly to the fact that I was too anxious to be in the same room as that dress on that day! Everything went off without a hitch, though, and you can read more about it and see more pictures here and here.

CK garden 4
Even though the results of this collaboration were excellent, I'd be extremely hesitant to do it again. Chrissy is super cool and laid-back, so was pretty easy to please, as long as the dress fit and was comfortable! I'm not sure other brides would be so easy to work with. Chrissy's budget was a set amount, which included all materials, and whatever was left over went to me. I over ordered on the fabrics in case I had to remake any parts, and I tracked all the time I spent, from re-drafting to ironing to sewing and fitting. In all, I ended up earning less than $10/hour. Definitely not a living wage, so don't expect this to become a new side business for me! But I gained a TON of experience, satisfactorily worked through some crafty challenges (which is probably what drives me the most; that was fun!), and got to be even closer friends with a super cool chick. What's not to love?

CK Tim 2
A success indeed. (A few more photos here.)