Monday, September 26, 2011

Wedding flowers

H flower O bout
On Saturday, Rob and I attended the sweetest wedding ceremony! My co-worker and friend Oliver and his lovely new wife, Hilary, had a short and sweet ceremony followed by some fun signature drinks, delicious dinner, and lost of dancing! (okay, we didn't dance very much because we overdid it on the drinks earlier in the evening...) It really was one of the nicest events we've ever been a part of. Weddings are so affirming, you know? Of the love of the new couple, but also of your own. We held hands and beamed through the entire thing.

OH bouquets
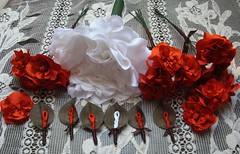
Oliver and Hilary did everything on a very tight budget, and so they called on a lot of their friends to help out. I happily volunteered to do fabric flowers for the couple, without really knowing what I was getting into (!) We chose to use the same Radiance cotton/silk blend I used for this wedding dress, though went with pure white for the bride and a lovely rust for everyone else, as this was a fall wedding.

OH corsage
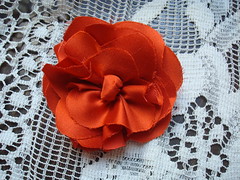
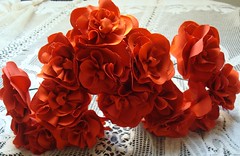
For the bridesmaid bouquets, I followed this Martha tutorial, which was super easy! I also made five pinnable corsages for moms and special wedding assistants using the same method.

OH bouquet 2
I had some trouble with the stems being sticky once I wrapped them in floral tape. I did some Googling and ended up testing the baby powder method, and it worked! Thanks, internet! Still, I wrapped a little ribbon around the bouquets to bulk them up a bit and give the girls something to hold on to.

H bouquet 1
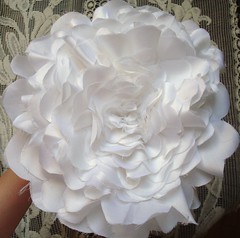
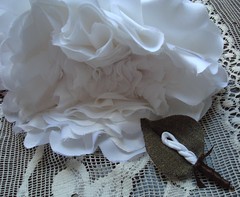
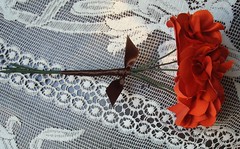
Hilary's bouquet was a bit more challenging. She had seen a similar large bloom bouquet online and requested something like that. For the most part, I did the same thing as for the smaller flowers, but with many more layers and varied sizes. The problem was, the flower kept wanting to collapse on itself. After a bit of experimentation, I made a subtle cone out of a heavy interfacing and then sandwiched it in between the two outermost layers, which I tacked together at the top of the petals so the support would be invisible.

H bouquet 3
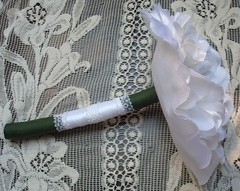
Figuring out how to make the stem was possibly the hardest part! I had stitched the petals onto four floral wires folded in the center (so it was eight wires thick), but that created a hinge at the top and made it easy for the flower to flop over. The solution? A skinny PVC pipe, which I glued to the flower at the very top, and then a 8" piece of a large-diameter hose over top of everything. I then wrapped that in more floral tape, then added some pretty ribbon and bits of vintage lace.

OH boutonnieres
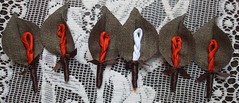
For the boutonnieres, I also went with Martha. We used a lovely wool suiting, but it was a bit ravel-y when cut on the bias, so I used fusible web just around the outside to make them behave. We needed some color, so I made a little tube of fabric, inserted some floral wire, and made a little twist. Then I wrapped it all up with some brown ribbon to match the bouquets.

OH wedding flowers
I was ridiculously excited on Saturday when we got to the venue and I saw the groom's dad walking around with his boutonniere on! They looked SO good on all the guys. Hilary and Oliver were lovely and glowing with happiness, and that bouquet when they walked down the aisle...gorgeous! All told, supplies for all of these flowers was under $50. I was reimbursed for materials, and also gifted the most amazing bottle of tequila as a thank you. It really was my pleasure; coming up with solutions to those crafty problems was just a bonus. Congratulations, Oliver and Hilary! I am so thankful I could be a part of your day!

Thursday, September 22, 2011

Hippos galore!

Edited to add: These are now for sale in my shop on Etsy
hippo pyramid 1
I've been keeping busy behind the scenes with a lot of wedding-centric crafting for others that I can't show you yet (soon!) and a couple new batches of hippos for some upcoming craft fairs I'm doing. These were "born" in early September, and I rushed through taking a bunch of photos so I could make some new hippo-centric business cards! That was fun.

fish hippos 2
Anyway, here are a few more photos of my little guys, which I love so much! I'm trying to amass as much inventory as I can as quickly as I can, because October is going to be crazy, and then I have two shows! However, people keep seeing these and asking if they can buy one, or two, or three... I'm having a hard time saying no!

3 hippos 

my folklore hippo butt 1 
 my folklore hippo butt 2
Also, did you notice? I had tags made! At the recommendation of Ronit, I worked with Michelle at Inked Papers and I'm incredibly pleased at how these turned out! I think they make my softies look that much more professional, so they were definitely worth the investment (though I only had to pay for the printing; the design was done by meeeee!)

Unrelated: I have a lengthy, rambly interview up with my friend Gregory Sherl, who happens to be one of my favorite poets, here. It's incredibly verbose, so don't say I didn't warn you!

Friday, September 16, 2011

Giraffe!

Giraffe 5
I made a new softie: a giraffe! This was a birthday gift for my friend JJ, who I also made these guys for a few years ago and this guy even longer ago. She's got a regular collection of my work!

Giraffe walking
(this picture of him walking just kills me)
I'm happy to report that this is an original design of mine! It didn't come together as smoothly or quickly as the hippo; I had multiple versions that were too sea-monster-y. I'm still not sure the scale works in relation to the hippo, but I was pretty pleased with how this guy turned out! Even though there will be more tinkering in my future.

Giraffe 3
I have sewn quite a few softies from a number of different patterns, and one thing I absolutely HATE is sewing in foot pads. I find it horrible. The pieces are so small, the seams are never smooth, it's a fight to turn everything carefully under the presser foot... Blergh. So when I decided to design my own giraffe pattern, I first had to figure out how to deal with the feet (I used a different, easier method with the hippos, and a more intensive hippo post is forthcoming, I promise!). Here's a detail shot:

Giraffe feet
So, yep, pretty pleased. There are some more silly shots of him in action on my Flickr page.

Also, something I forgot to mention previously: Chrissy, whose wedding dress I made and blogged about here, posted her own take on the experience here. Click over for some really exciting pictures of me ironing, some ridiculously cute pictures of my cat, and Chrissy's write-up of the incredibly sweet thank-you gift she made me.

Psst! This is my 300th post! Yowza!

Monday, September 12, 2011

Dear Jane catch-up

DJ C7
I *was* caught up on my Dear Jane blocks... For about 2 seconds. Now I'm behind again. But I did hit another milestone: row C is done and pieced together and stashed away! What you see above is block C7, which has 45 pieces and I finished on 7/31/11. I'm still not happy with the points of my diamonds, but I'm not going to redo any of them, either! Finished is better than perfect...

DJ C8
Here's block C8, which I love so so much! I think it's that gorgeous background fabric, which I'd gotten in a swap long ago. So pretty!

DJ C10
Block C10 was pieced in one day, in which it rained all day. It took me the whole day, too!

DJ C11
I finished block C11 on the Amtrak on the way to Maine for a mini-vacation we took last month. It was lovely, and I like the outcome of this block, even though I don't really love the fabric. It was also a swap extra from years ago, and I finally decided to put it to use somewhere.

DJ C12
Here is block C12, which has the most pieces yet, at 49! Wooo! This one took a while. I started it on our Maine vacation, but didn't finish for another week.

DJ C13
And here is C13, which I had a difficult time with. Jane's block has blue in the corners, but it's not pieced. So far, I have only used one focus fabric + my Kona white in each block, and I didn't want to change that for this block only, so I found something with a darker color in it (the green leaves) and fussy-cut the pieces so they would appear in the corners. I am actually quite pleased with how it turned out--pops of green in the corners give the same kind of effect, but I didn't add additional pieces or fabrics.

And with that, I've shown you all of my finished blocks to date! I've been working on other things and am at least 2 blocks behind again already (boo). Still, as of 9/2/11, I have 50 blocks done, and I'm at 989 pieces! Wow.