Wednesday, August 27, 2008

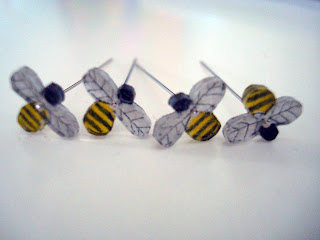
Shrinky Dink pins

After feeling inspired for a while, I finally got at making some custom Shrinky Dink pins over the weekend. I might be addicted...

I first got the idea to do some, especially bees, from the book Pretty Little Pincushions. The beehive pincushion is cute, but it's SO much cuter with little bee pins in it! Then when I saw the Wee Wonderfuls Shrinky Dink pin tutorial last week, I knew I had to do it. I got my new colored pencil roll out and spent Saturday and Sunday mornings tracing and coloring. I just guessed on the size, but the bees turned out to be perfect! Their finished wingspan is about 3/8".

Unfortunately, these butterflies didn't work out as well. They're a little bit bigger than I'd hoped. Oh well--they're still cute. Although I think I'm coloring them too heavily with the colored pencil. It seems as though the color on the back/rough side is kind of chalky and will rub off once they're shrunk. Learning curve, I guess.

I made these daisies using white Shrinky Dink (the others were made using the clear stuff) and then baked them on some yellow glass-head quilting pins I had. I was worried about the size ratio of center to petals, but I think they turned out well.

They also look pretty cute with the bees!

Monday, August 25, 2008

Pencil roll

Yet another project from Last-Minute Patchwork and Quilted Gifts. I'd always liked this project, but was recently inspired to make it because I finally bought some colored pencils and because I liked Marisa's version so much. This is one I made on Friday afternoon. (Seems my summer Fridays are turning into crafty Fridays!) I think this project is in the 2-4 hour gifts and it took me about 2-1/2 hours to assemble it, longer to pick out the fabrics. It was really interesting going through the scraps in my stash and trying to match up the colored pencils with fabrics that I had. When I had the scraps all laid out for cutting I was really NOT liking the fabrics all together, but once I assembled the patchwork piece I really liked it! So, there you go.

I used some linen I had on hand for the outside and the pocket. I had a really hard time getting it to stay straight. I realized after the fact that I should've just pulled one of the threads to make sure I had a straight edge before I started cutting, but that didn't occur to me until too late. Oh well. I added a flowered ribbon to the outside for some extra cute, but it's right in the middle and that's where the ties are, so you can hardly see it. Again, oh well. It's good enough for who it's for: me!

Not sure if you can see it here, but I had some issues with my seam allowance. It must not be exactly 1/4", because over 23 seams in the patchwork my final piece ended up being 3/4" longer than it was supposed to be and didn't match up with the pocket and outside and batting pieces I'd already cut, per the pattern. Oops. I compensated by not stitching directly in the ditch for the first and last three pencil slots. So that's a little wonky, but not too bad. I've already used the roll a couple of times this weekend for some Shrinky Dink projects that I did. A post on those TK later this week! At any rate, I need to get that seam allowance thing figured out, but I want to sew the reverse patchwork for my Little Bits quilt first so that the two (hopefully) match up when I assemble the quilt. This will make more sense when you see the finished project.

In other news, Rob and I watched Lars and the Real Girl again last night. LOVE that movie. Love love love! If you haven't seen it yet, add it to your queue and bump it to the top! And while I'm talking about creative things that I love, I have just fallen in love with the music of Bon Iver. Wow. The album is "For Emma, Forever Ago," which I think is an amazing title, and you can hear some of his music at his MySpace page. Go. Listen. Love.

Wednesday, August 20, 2008

Works-in-progress

Here's the progress of my first mini-quilt, which I first posted about here. As I mentioned before, this is inspired by a quilt found in the book Bits and Pieces, which I really like. This is my first time doing freezer-paper appliqué. The author's method is to iron on the freezer paper circle; trim the fabric to a 1/4-1/8" seam allowance; do a gathering stitch in the seam allowance; baste through the front, freezer paper, and gathered seam allowance; stitch the circle to the square; and pull out gathering stitches, basting stitches, and freezer paper before stitching down the last inch or so. Phew!

I followed this method for the first couple of circles, then decided it was too laborious and used too much thread. So I followed the directions through the gathering stitch part, then ironed the circle and really pressed the edges so the fabric would stay put. Then I stitched it to the square and removed the gathering stitches and the freezer paper with about an inch left to stitch. This worked out very well and saved a bit of time. I was even able to press the circles and leave them for another week before stitching with no loss of shape. Now I'm working on hand-stitching the blocks into rows, and then the rows into the top, sans border. Surprisingly, the rows are coming together very quickly. I may actually have a completed top soon!

Here is another WIP that I just started on Sunday. It's going to be a slightly modified (mostly just for size) two-sided version of the "Little Bits" quilt from Last-Minute Patchwork and Quilted Gifts. And it will, indeed, be a quilted gift! I'm a little concerned that the intended recipient won't like the fabrics, and I've never done a project like this where I only use two fabrics, so it'll be a little adventure for me. I just hope it works!!

Monday, August 18, 2008

Lorelei apron

Here's my first of what will probably be a few projects from A Is for Apron. It's the Lorelei apron and I made it as a birthday gift for my mother-in-law. The project went fairly well. I had to do a bit of improvising with it, though. The pattern calls for 1/4 yard for the neck strap and pockets, but it wasn't enough fabric. I was able to piece the neck (instead of cutting it on the fold, as the pattern called for) and then I lined the pockets with extra of the main fabric. Not a big deal. I eliminated the ricrac because I didn't have any on hand and I wanted to whip this up quickly.

This project also represents my first foray into making my own true bias tape, not the fake stuff I've made before. I used my new bias-tape makers and they were great. I somehow made way too much, so have a lot of double-fold 1/4" of that cute bias sitting around now. Oh well. I followed the bias-tape making instructions from Easy Bias-Covered Curves and it was fine. I pieced my strips together at an angle so the seam wouldn't be vertical (like I do with my quilt binding) and then tried to press the seam open. That didn't really work--when the tape came through the bias-tape maker the seams all pressed one way anyway. So, note to self for future projects.

I made a couple of other mistakes, like applying the binding to the wrong side (or, actually, the right side) of the body first, binding the whole thing before attaching the straps, making the strap points both point in the same direction... Minor stuff. Little things that I can chalk up to a learning experience.

And now for the ubiquitous "weekend update" part of my Monday post...

Our weather is warm today but was a little cooler over the weekend and last week. The good thing? This results in more kitty snuggles, as seen above. Cuteness.

On Friday Rob and I saw Vicky Cristina Barcelona, which was really good and probably in my top 3 of recent Woody Allen movies. On Saturday we went out for breakfast, walked around, ran errands, and I went solo to a cookout my friends were hosting. It was overrun with squealing children and giant doggies and was a bit overwhelming for me, a kid-not-liker and cat-owner, but it was really nice to see my friends and meet some new people. Yesterday we just stayed home and did our own things. I made some progress on two different works-in-progress, which I will post on later this week. Last night we watched Belle de Jour, which was interesting but not my favorite Bunuel. I really like his work, but was a little "meh" about this one.

We also watched a bunch of the Olympics, like every other human being on the face of the earth. I saw some crazy sabre fighting that looked like laser tag with fencing swords. It kinda freaked me out and I went back to watching a Shear Genius marathon on Bravo. Much more comprehensible.

Friday, August 15, 2008

Little pincushions


Here are some little flowerpot pincushions I whipped up last Friday afternoon. I'd gotten the little pots (about 1-1/2" high, so they're very small) at Michael's a few weeks back. They were four for $1 so I couldn't resist! They're a bit fragile, though, and I scared myself by breaking one when I was shoving in the cotton and fabric top. Oops. That's why I bought two packs! Foresight, people. 

I originally thought I could stuff them with flax to give them a little more weight at the bottom--they're tippy. But it turns out that when I was stuffing in the top with the flax in the bottom was when the pots would crack or break. Lesson learned. I will live with them being tippy. 

These were somewhat inspired by Pretty Little Pincushions. Mainly, the book made me think more about pincushions, especially as gifts. And these will be going to good homes soon, because what am I going to do with six flowerpot pincushions?!? Now I have a little flowerpot garden lining my bookshelf. It's very cute! 

As I mentioned in my post about this book, I was also inspired by the thought of making my own themed pins. In anticipation of that, I bought a bunch of steel flat-head pins and ordered some Shrinky Dink plastic online! I am probably ridiculously excited about this, but I don't care. I used to make Shrinky Dinks with my grandmother all the time. I bet the smell will take me back... Ahh, melting plastic... 

Wednesday, August 13, 2008

Improvement

Here is the "before" picture of my sewing area. It's okay, I suppose. I really like the thread rack. That's a cookie sheet up there acting as my magnetic "inspiration board." There are also photos of my grandparents and one of me with my quilting grandmother. The framed portrait is my mom's senior picture! She hates it, but I love it. The cards that are up are all thank yous from family and friends for handmade gifts. I like to keep them because they make me feel appreciated. Maybe that's a little selfish, surrounding myself with the praises of others, but I like to remember the things I've made and the good homes I've given them to.

Anyway, this area needed a bit more help. You can see that my fabric basket is overflowing with rotary cutters and scissors, so I invested in a little improvement:

Meet my new pegboard! It's from Wall Control and was actually very affordable. It's steel, so it's magnetic, and it's blue! Rob helped me install it last week, and after two trips to the hardware store on Saturday to finally get the right hooks, I put it to work!

I am really loving it. It holds my scissors and my rotary cutters and my rulers and some spools of ribbon and my brand new bias tape makers, and I can still use magnets to hold up the things that I find inspiring! Love love love. Highly recommended.

What else is new with me? Not a whole lot. Rob and I had a nice, mellow weekend and a lovely anniversary dinner. On Saturday morning I actually watched the "new" Nancy Drew movie and I really liked it! I was going to hand-stitch while it was on but didn't because I became so enthralled! It was very very sweet and, as a big fan of the books, I felt it stayed true to the innocence and sweetness of the character. On Saturday night we watched Manda Bala, which was interesting. Then on Sunday night we rewatched Batman Begins, but I slept through the last 20 minutes or so because I was so tired. I spent all day reorganizing closets and cleaning bathrooms, minus the couple of hours to see Step Brothers, which was dumb and funny--and shouldn't that title be hyphenated? Anyway, it's a little surprising that I missed the end of Batman because I'm sort of in love with Cillian Murphy, even though he always plays creepy villain guys. It's something about those eyes and those well-defined cheekbones... *sigh*

Now, due to some unforeseen (and very unpleasant) circumstances, Rob and I find ourselves with an entire weekend ahead of us! Free! What will we do? See Vicky Cristina Barcelona, of course! Rob is a huge Woody Allen fan and we feel so fortunate to live someplace where we can actually see his new movies in the theater! When they come out! Unheard of. We are lucky that this genius man is so prolific, too.

In the middle of stressful bad-ness, I decided, on a whim, to join a mini quilt swap via a Flickr contact. Am I crazy? Time will tell...

Friday, August 8, 2008

Five years...

Okay, this is definitely NOT going to be a crafty post...

It's pretty amazing how much can happen in five years. Five years ago tomorrow Rob and I were married, in a church, in Wisconsin. Since then, we've moved to Boston and then to Salem, adopted two lovely kitties, gotten our master's degrees, jump-started our careers, made some new friends, traveled the East Coast, visited old friends back home... We've also endured some difficult times and some hard losses and health scares, but we've done it all together.

When we got married we were young and fresh out of college. People on the East Coast don't marry nearly so early as those in the midwest, it seems, and though our friends back home were all married or engaged, our friends in Boston were mostly unattached. People remarked, often, on how young we looked, too young to be married. I used to scoff. But now when I look back at those pictures, I do think yikes! We sure did look young.

But we've never looked back.

So on the eve of our fifth wedding anniversary, I'd like to publicly state that though I don't have the traditional gift of wood or the modern gift of silverware for you, Rob, I do have more love for you than I ever could have imagined. It's gotten us this far, and I truly believe we have a long way yet to go.

Happy anniversary, Bert. I love you.

Wednesday, August 6, 2008

Built By Wendy Sew U skirt, take 2

This is my second attempt at the skirt pattern from Wendy Mullin's Sew U book (the first was blogged here). I don't think the word "attempt" is appropriate here, though--I feel both skirts were really successful! The above pictures is a close-up of the fabric (with me wearing it). I had a yard of it, which is a Robert Kaufman print from the "Fresh as a Daisy" line. It was so adorable that I had to try to make a skirt out of it!

Because I only had a yard, I had to cut one of the back pieces along the lengthwise grain, whereas the other pieces were cut along the widthwise grain. I think everything was supposed to be along the lengthwise grain, but I'm kind of a miser when it comes to fabric and try to use every single inch in a project instead of buying an extra half yard. Anyway, I don't notice a difference, and because the pattern isn't directional, you can't tell by looking. This bodes well for me and my fabric "economy."

The finished product! I did have a couple of issues that I needed to solve. First, even though the print is on a nice, heavy, Kona cotton, the white background was a little too sheer for my taste. So I bought some white 100% cotton from the fabric store in the city. I didn't want to line this skirt with a white Kona cotton because I thought it would then be too heavy. The Kona is so nice; the 100% cotton I bought to line the skirt is not as high-quality, but that's what I needed or this skirt would've come out mega-structured. Ick.

I wasn't sure how to handle the darts or the facing (or if there should be a facing, or understitching...) with the lining, but I followed Wendy's instructions and also kind of went with my gut. I still pressed the darts to the centers, didn't snip them at all, and just lined them up when I stitched together the skirts at the waists. I was worried the skirt would be too bulky at the tops of the darts, but it's not even noticeable. I did still understitch the seam allowance to the lining, just to hold it in place.

So cute! And SO comfortable. I love wearing cotton, especially in the summer. I've really been sticking with natural fabrics as much as possible, and it's made a big difference in how I look and how I feel in my clothes. Anyway, you can see here that I added a little green lace to the bottom of this hem. It was in my stash from a dress I made 2+ years ago, and it was perfect! I was going to stitch it to the lining so it would just peek out, but it's only around 1" wide and I worried about hemming the lining to the wrong length so either the lace wouldn't show, or it would show along with the lining. Ick. So I just stitched it to the outer print and hemmed the lining another 1/2" shorter than the skirt.

It took me about 3 hours (+ cutting) to make the first skirt. This one took me about 3 hours (+ cutting time), and it had a full lining, two hems, a trim (which the first one had as well), and I had to hand-stitch the lining to the zipper in the back. Not bad!

So, I made this skirt on Sunday, but I cut it and two more dresses on Saturday evening. Those are in the works mentally but I haven't made any stitching progress on them yet. I have made quite a bit of progress on the first of my mini quilts, so that is exciting. I've also become obsessed with ideas for pincushions but haven't actually made any yet. Soon... I have many ideas brewing! I'm also hard at work on a craft room overhaul. It's nothing too major, but will make a nice difference. Before and after pictures TK.

Monday, August 4, 2008

Yet another belated birthday present

As the title of this post indicates, here's yet another of the belated birthday presents I've been crafting lately. This is take two of the fabric basket I've already posted about here. This is for my friend Hallie and is less than a month late, so not too shabby.

I made some of my planned modifications for this one. I resized the lining and it came out better but still could've been more snug. I also adjusted the measurements for the top drawstring piece and that went on much easier this time. I made the bottom and sides one piece, which was an improvement. But I forgot to attach the handles to the sides before assembling the box. Ugh--difficult! Need to remember that next time (if there is one).

I also made my own non-bias bias tape out of the lining fabric for this project. It's a nice touch. I've ordered a set of bias tape makers (I faked these with a pin on the ironing board trick) so I see a lot more of those in my future.

Must run and head home for the day. Blogger says this is my 50th post; can it really be?