Monday, January 30, 2012

Sew Colette - Meringue skirt, finished!

Meringue skirt 1
I was catch-stitching the hem facing until almost 11pm last night, but I finished! Here are some hastily-taken pictures of me at the office this morning.

Meringue skirt 2
When I decided to sign up for the sew-along, I had no idea what to make this skirt out of, so I hastily ordered some charcoal 100% twill. It's a good, basic skirt that I will be able to wear with a lot of different things, but maybe wasn't the best choice. After working with it for a bit, I realized that the twill picks up every hair and fuzz it comes close to. I created the entire skirt out of the same fabric, so the hem facing is twill, too, and is a bit "grabby" with my cotton tights. I probably should've faced it with something a little more slippery to counter that.

Meringue skirt 3
In a lot of ways, this is the best garment I've ever made. From the really cool invisible-zipper-insertion trick following the book's instructions, to the faux overcast stitch I used to finish the side seams (instead of my usual pinking), to using my pressing ham (Merry Christmas to meeee!) to press the darts, to catch-stitching the hem facing by hand... Yep. I even traced the pattern from the tissue onto freezer paper first. This is probably the first time I've ever done things really right. And the result is a really well-made garment that fits incredibly well.

Meringue skirt back 1
I made a few adjustments to the original pattern. Because I'm a little short, I removed 1" from the length as I was tracing the pattern, since you can't really take it off the hem at the end. I also lengthened the back darts by 1.5" for a better fit; for some reason, the tips just didn't look right. I'm not sure they do even now, but part of that could be the bulkiness of the fabric.

Overall, I'm quite pleased. The skirt fits perfectly just below the waist and hasn't done any shifting around, which is fantastic. For a beginner garment, there are enough challenges and interesting bits to keep it, well, interesting. Now it's onto the Pastille dress--which, I must confess, scares me the most of all the projects in the book. A well fitted dress with little embellishment?! No time to be scared, though--I just have to dive in!

ETA: My skirt was featured! Thanks, ladies!

Thursday, January 26, 2012

Christmas crafting round-up!

jingle mice 3
Hey, I know! Now that it's a month past the holidays and the last thing anyone wants to think about is Christmas, why don't I finally post about what I made this year? Yeah? Okay!

jingle mice 2
First up is this batch of jingle mice ornaments. Aren't they cute? I made them following this tutorial, though I re-drafted the mice to be not quite so tall. I made only this handful, one each for a few of my favorite people. I'm really liking this ornament-a-year kick; here's last year's!

body care sets
Most years, I try to figure out one handmade gift that I can give to everyone, and then produce it assembly-line style. I also typically spend WAY too much time at the sewing machine, so for whatever reason, this year I decided that everyone was getting body care. And sewn drawstring bags because, who am I kidding, sewing is definitely my strong suit! I followed this tutorial to make the lotions, this tutorial for the cuticle balm, and experimented with these tips to come up with the scrub. And of course, the bags come via the In Color Order lined drawstring bag pattern, which I used to make little bags to the perfect size. I highly recommend purchasing the pattern, but if you just want to test it, the free bag tutorial is excellent!

body care labels
I've gotten a lot of good feedback on the body care, so I guess they were a win, but man, were they tricky! I didn't want to give anything that I couldn't vouch for myself, so I did a lot of experimenting beforehand to settle on recipes. I'm happy to say that the cuticle balm is AWESOME and definitely the easiest thing to make! The scrub is also fairly easy, though I had separation for a while after it was mixed, and some oil seepage from the top of a jar (not in a bag, thankfully) that freaked me out. The lotion, however, has been hit or miss. My test batch was miniscule and turned out awesome, but all of the ones after that separate out, so I have to keep stirring it for a few hours before pouring into jars. At that point, it takes about a week for the lotion to set into the thick cream it's supposed to be, but once it's there, it's amazingness. Huh. I can't figure out what my issue is, but I've been using grapeseed oil, so maybe that's part of it? It's a lighter, more "dry" oil, and putting olive oil on my skin just seemed... heavy. Let me know if you make some, though!

State frames
My parents and the newlyweds each received one of these embroidered state frames, which were a huge hit. I spotted this tutorial via Pinterest, and it's just perfect. Punching the holes with an awl was probably the most difficult part, so they really weren't that bad. And as a one-of-a-kind gift, they can't be beat!

toiletry bags 1
There were two tricky guy friends on my list that I didn't want to subject to my lemongrass lotion (though, really, it's a unisex scent!) so I whipped up these toiletries bags using some Ikea fabric and heavy vinyl I had on hand, following this tutorial. Despite being a real pain to turn right-side out, they are fairly easy to make and look so nice once they're finished. They were also a hit!

241 for V
And for my very spoiled friend Vanessa I couldn't resist whipping up this bag using the Noodlehead 241 tote pattern and some fun Alexander Henry fabric. Unlike my first attempt at this pattern, I added the outer pockets, which make a huge difference and adds much cuteness! This bag was also a hit.

I hope to be back in this space soon to reveal one last gift made for a very special grandmother. I'm one week into a head cold that has knocked me flat, so here's hoping I get some energy back soon!

Monday, January 9, 2012

This is just to say...

...that I'm jumping into the Sew Colette sew-along hosted by Sarah of Rhinestones and Telephones and Erin of Miss Crayola Creepy, and you should, too! First up is the Meringue skirt, and I maybe just ordered some organic gray cotton twill with which to make it...

Wednesday, January 4, 2012

Super massive Dear Jane update!

DJ squares 12-31-11
It's been a while since I've posted one of these, so there's a lot to catch up on! But first, the big news: I completed 50 blocks--made of 1,134 pieces--in 2011! That brings my completed total to 66 blocks, comprised of 1,347 pieces, not counting sashing. I've assembled rows A-D, but I won't be putting the whole top together until the blocks are done. Yahoo!

DJ D1
I'm ridiculously excited about this. It was almost a year ago that I posted that I'd like to complete one block each week for the year. My ultimate goal was 52 blocks, but I knew between traveling and work and projects and, well, life, that I would actually shoot for 50 and if I hit it I'd be pretty happy about it. So, here's a quick showcase of the 16 (?!?!) blocks I haven't yet blogged. Above is block D1.

DJ D2
Here's block D2, which I really enjoy, though I can't pinpoint why. Maybe just the shapes?

DJ D4
This is block D4 (D3 was previously blogged here). This is completely pieced, even the melons in the corners. Curved piecing is not so bad, especially by hand!

DJ D5
Block D5, which is pretty straightforward.

DJ D7
Block D7 (D6 was blogged here). Another straightforward one, which was welcome!

DJ D8
This is block D8. I really love how this block turned out, though it was difficult to make! I fussy cut the pieces to get that radiating stripe feeling. This block is entirely appliquéd using the back-basting technique that I favor. I still feel like my points could be pointier, but this is the best I can do at this moment. I wonder how much better I'll be by the time I finish this quilt?

DJ D9
Here's block D9. I think I was trying to do something so the orientation of the ducks would be consistent, but now I can't remember if I succeeded or failed. Probably best if I never know, eh?

DJ D10
Block D10. Straight lines, pointy points, matching corners. Ahh!

DJ D11
Block D11, which I think is less successful. I had trouble with the diamond appliqués, which I think have a bit of a wonk factor. Still, what would Jane do? Make it work.

DJ D12
Here's block D12, which I think turned out fine, but I'm not so keen on my fabric choice. Choosing fabrics has been really difficult--more difficult than I would've expected. I'm preserving the trip around the world in the center of the quilt, but in the outside it's tricky to tell what colors the original fabrics were. Also, Jane used a lot of browns in her Civil War–era quilt, and I don't have a 1930s equivalent. I've marked a lot of them on my chart as "multi" or "dark", and I guess this was the best I could come up with for this block.

DJ E1
Here's the beginning of row E! (Block D13 is blogged here.) I had the same issue with the fabric as with the previous block, but think this one turned out okay. Again, it's completely pieced instead of appliquéd. The center was a little tricky to assemble; I hope it holds together in the finished quilt!

DJ E2
Block E2, which looks a little pink here. Pieced and appliquéd.

DJ E4
Block E4 (E3 is here), which looks REALLY pink here. Simply pieced.

DJ E5
E5, which is pieced and appliquéd. I thought I was being smart when I marked where the center circle was on all of the side pieces so that I didn't sew them all the way to the center points, which would've been difficult to match up.

DJ E6
Here's block E6, which has a lot of little pieces! The squares near the corners are appliquéd and aren't perfect, but I think they're fine.

DJ E7
And, finally, block E7! I finished this on New Year's eve during a Twilight Zone marathon. I had intended to fussy-cut these pieces so the stripes all ran the same way, but that clearly didn't work. I did my best to keep the block symmetrical, though.

So, that's it! A year ago, I only had 16 scattered blocks completed. I now have 66, including four full rows assembled! That feels like an accomplishment, though I still have a long way to go. I'm renewing my desire for this year (and secretly hoping to catch up on those last 2 from 2011 plus complete a full 52 for 2012) and can't wait to see my progress in another year's time. Cheers to hand stitching, productivity, and Jane!

Sunday, January 1, 2012

Some creative goals

us before Olly's wedding
photo taken just before leaving for Oliver and Hilary's wedding in September

Happy new year! My parents were here from Wisconsin and staying with us for a week, but today they're headed home. Rob and I are drinking beer and enjoying the last week of RedZone. We had a lovely holiday and a low-key new year; I hope yours has been equally wonderful!

I am way behind in blogging my projects. I have plans for a big year-end what-I-made collage (mostly because I'd like to see it!) and a Dear Jane progress update, but I have so much un-blogged already... So, here's a quick run-through of some lingering non-holiday-gift projects (because those will need their own post), plus some creative goals for 2012.

pleated clutch 1Noodlehead 241 Tote 1
Perfectly Pleated Clutch from Amy Butler's Style Stitches and the Noodlehead 241 tote, sans pockets

1) Launch my business! As I mentioned way back here, I'm actively taking steps to launch my own Etsy shop. While I've made a lot of progress, I still have a bit to do before I can open my shop. The holiday break has really derailed that, but I'm working to get back on track. If all goes well, I hope to be up and running by Valentine's Day!

denim whale 4
Denim whale, based on this tutorial

2) More softies! Related to the goal above, I'd like to develop more softie patterns and softies this year. 2011 saw my creation of my first original pattern, a hippo! I also created a giraffe, and made the whale, shown above, based on instructions posted here (with a little help from Google translate). I have more animals I'd like to draft, sew, and hopefully sell in 2012!

3) Find my audience. I did two different shows at the end of the year: one a local craft market, and one a holiday edition of the apARTment show we did over the summer. I wouldn't necessarily call them failures, but I wouldn't say either show was a raging success, either. I have various theories about why I didn't make a lot of sales, but I think increased visibility plus a better venue (Etsy) is a good start.

Hilary bday necklace
necklace for Hilary's birthday; pattern from Stitch Magic

4) Join the community. This is something that's been bothering me for a while... I consider myself a part of the modern crafting movement (which I see as tangentially related to the 3rd wave of feminism, but that's a whole other discussion), but lately I've really just become a lurker. I'd like to change that. The reasons why I don't comment on 99% of the blog posts I read are that I'm usually at work, eating lunch and answering the phone and otherwise just swamped; I don't know that I have anything new to add; I don't think bloggers with 100+ regular commenters need to hear from me; and I'm shy. However, when I *have* overcome that shyness to interact with other bloggers, good things have happened. If you blog, please let me know! I'd love to hear from you, and make sure you're in my Reader and hearing from me!

Socialite dress voile back 1
Socialite Dress #2, in voile; still unsure about the back

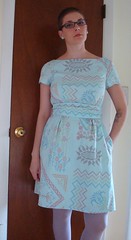
5) More garment sewing! I am head-over-heels in love with everything Colette Patterns. I did a bit of garment sewing in 2011, and that's something I'd like to continue in 2012, beginning with reading the CP book and making the velveteen Peony I've been dreaming about for months...

DJ squares 12-31-11
6) More Dear Jane! This is something I really kicked into high gear this year. I am so happy that I did. I was trying to sew one block per week, with a final goal of 50 on the year, and (spoiler alert!!) I did it! I finished block 50 last night! Massive Dear Jane update to come yet, but 50+ blocks is my goal again this year.

So, that's it! What are your creative goals for the year?

Friday, December 16, 2011

Peony dress!

Peony dress 2
Wrapping up the wedding posts, finally... I made myself a Colette Patterns Peony dress to wear to my brother's wedding rehearsal. I had made myself another version of the Socialite dress and did wear it to a different wedding (though that's another post), but at the last minute decided I wanted a Peony instead. So I scheduled myself one hour of work between getting home from my day job and making dinner for two whole weeks. I was able to get most of it done, but because I decided to fully line the dress, I completed sewing the lining to the zipper on the plane and the lining to the arm holes in the hotel room! Still, I finished in time to wear it to the rehearsal! Go me.

Peony dress back
I knew when I saw the Anna Maria Horner Needleworks fabrics that I wanted to create something out of them that wasn't just needlepoint. I was going to stitch on the little cummerbund belt, but ultimately decided it would be too much. I left the fussy-cut sleeves unlined, however, so that I could add embroidery / cross stitch if I wanted to over time.

Peony dress 3
I really like this dress! I think it's gorgeous but casual. It has pockets! The little belt does wonders.

Peony dress 1
Despite the simplicity of the pattern, I had a few issues with creating this dress. I did my first full-bust adjustment, and it certainly shouldn't be my last! It took a bit of time, though. And then, somehow, I messed up the bust dart on one side. It's curvier than the other, and without the belt looks absolutely awful. I also think I made the belt a little too snug, as it actually gathers the dress a bit at the waist. It takes some fiddling to get it looking right, but then I'm set all day. I think the next time I make it, I should either take the belt out or the dress in or both. And fix the bust dart, because I would like the option of wearing this belt-less. I have a holiday version in mind with longer sleeves, so here's hoping I can get to it! Things have been INSANE the last few weeks, both at my day job and at home / crafting.

rehearsal Peony 3
Anyway, if you'd like to see the full album of family wedding / Cincinnati pictures, go HERE. (And yes, that photo above is me trying to document the dress pre-rehearsal, in the hotel room.)

Tuesday, November 29, 2011

Wedding Chantilly

us wedding day 1
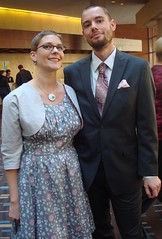
Finally--the dress! Above is a photo of Rob and me taken in the hotel lobby before my brother's wedding. I finished the dress way back in September and knew that I wouldn't have the time or resources for a proper photo shoot on the actual wedding day, so I had one at home when the dress was finished. Just so I could show you the details I love!

wedding Chantilly 4
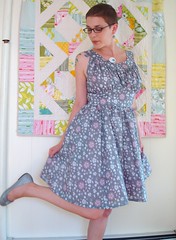
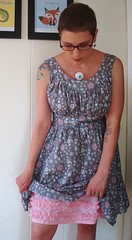
This is, again, the Colette Patterns Chantilly dress, the same pattern I used for my birthday dress. I really love this pattern. There is a LOT of hand-gathering so it takes a bit to cut out and construct, but it is SO worth it.

wedding Chantilly 1
I used an Innocent Crush voile (possibly my favorite print/fabric to come out in the last few years; definitely saved for this special project!) by Anna Maria Horner for the outer layer and a light pink cotton lawn for the lining. The dress is really lightweight and floaty, but it's still a lot of dress! Or, skirt, rather:

wedding Chantilly twirl

wedding Chantilly 3
This version has pockets, which is awesome!

wedding Chantilly hem 2wedding Chantilly underskirt 1
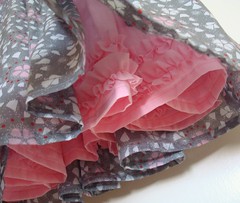
I also wanted to make it a little more fancy than my previous version, so I added two rows of bias ruffles to the hem. It's a little trick I learned from this book. It pushes out the lining just enough; not as much as a petticoat would, but I didn't want to steal the show, plus I wanted to keep the dress wearable to the office and more casual functions.

me wedding Chantilly 1
Bottom line: I adore this pattern and highly recommend it for a party-feeling dress! I also want to note here that my jewelry is by Stonehouse Studio and I really really love it. I can't decide if I like the necklace or earrings more...